
Central Loop, Dying Light 2 Map

Fish Eye Canteen Pk Floating Fortress There Are 70 Graffiti / Murals in Dying Light 2, 35 of Which Are in Central Loop. Finding All Graffiti Tag Murals Unlocks...
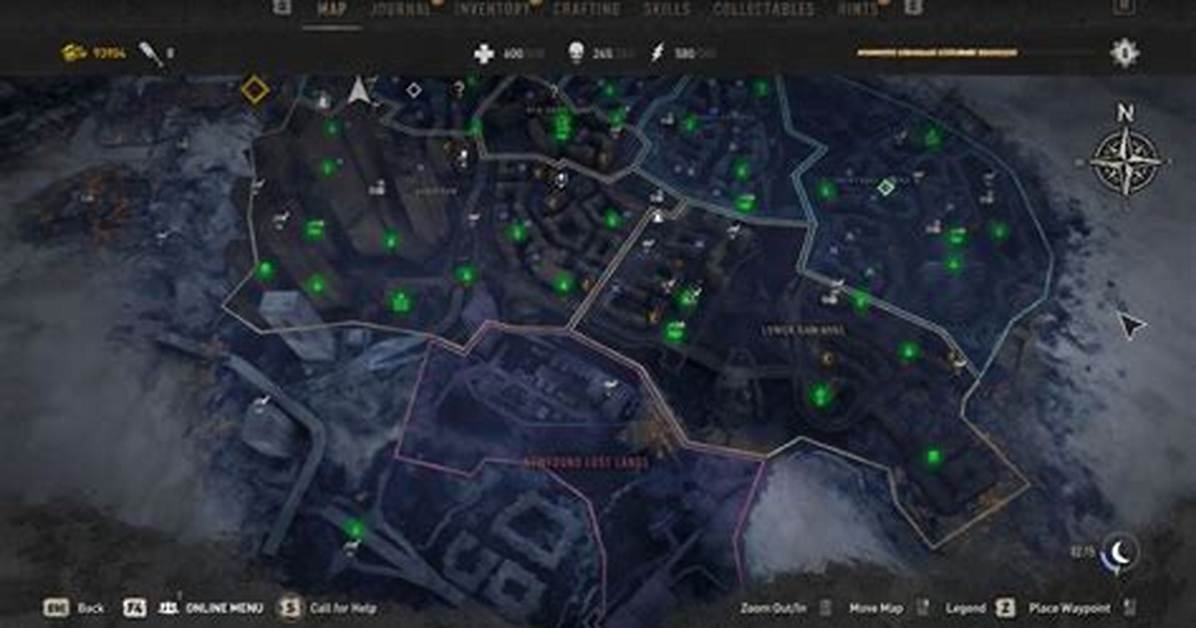
Fish Eye Canteen
PK Floating Fortress
There are 70 Graffiti / Murals in Dying Light 2, 35 of which are in Central Loop. Finding all Graffiti Tag Murals unlocks the "Street Art Aficionado" achievement / trophy.
A Bag of Cash
Bad Habit
Birds of Curse
Blind Beauty
Blown Money
Carousel of Life
Cherubinator
Death Girl
Dirty Money
Face From The Past
Good Luck
Good Night, Villedor!
Greed
Heart vs Money
Hell Hound
Hellfire Sausage
Hunting for Hunters
Jaws
Jing Cats
John Dog
Make Love, Not War
Monking
Ouroboros
Pestilence
Plague Doctor
Power of Light
Rais Off Your Knees
Space Explorers
The Boss
The Doors
The Great Explorers
The Peaceful Warrior
Toy Soldier
Tree of Death
Why So Serious
There are 63 Tapes in Dying Light 2, 41 of which are in Central Loop. Finding all Tape Recordings unlocks the "Audiophile" achievement / trophy.
Be Fruitful and Multiply
Council of Mankind Session #1 This tape can be found inside a military container on the roof of the building where the GRE Anomaly C-A-56 (5) is located.
Council of Mankind Session #2 You'll find this tape in the small building on top of the VNC tower. You can take the elevator to the top after completing the main story quest "Broadcast".
Council of Mankind Session #3 This tape can be found inside a military container.
Cpt. Posner Status Reports to Col. Williams #3 The tape sits on a crate inside the guard tower.
Cpt. Posner Status Reports to Col. Williams #4
Cpt. Posner Status Reports to Col. Williams #5
Cpt. Posner Status Reports to Col. Williams #6 You can find this tape on a desk inside a military barrack standing on the west side of the GRE Anomaly C-A-67 (5).
For Alice #3 You can find this tape in the room in the upper part of the building.
For Alice #4 You can find the tape on a cabinet on the upper floor of the building.
For Alice #5
Frank Marwey's Journal #1 This tape is inside Frank's Room in the Fish Eye Canteen. To be able to enter this room you must reach the required stage in the main story of the game.
Frank Marwey's Journal #2 This tape is on top of a small windmill outside the Fish Eye Canteen.
Frank Marwey's Journal #3 You will find this tape on the upper level of Fish Eye Canteen (above the bar).
Frank Marwey's Journal #4
GRE Head Doctor Dr. Katsumi Report #3 You will find this tape inside GRE Vaccine Lab (2).
GRE Head Doctor Dr. Katsumi Report #4 You will find this tape inside THV Advanced Care (5).
GRE Head Doctor Dr. Katsumi Report #5 You will find this tape inside GRE Experimental Research (3).
GRE Head Doctor Dr. Katsumi Report #6 You will find this tape inside THV-GenMod Development Center (4).
Journal of a Nightrunner #4 You will find the tape in the Nightrunner's Hideout (2). It is on the small refrigerator standing near the generator.
Journal of a Nightrunner #5
Journal of a Nightrunner #6 The tape is located in the camp on top of the building with the radio tower.
Journal of a Nightrunner #7 This tape can be found on the rooftop of a tall building.
Journal of a Nightrunner #8 The tape is in a small box that you will find on a platform on top of one of the radio poles.
Lawan's Mix Tape This tape is in Lawan's apartment. You will get here while doing the main quest "The Shoe".
Prep for the next Fall This tape sits on a shelf inside a small wooden shed.
SHTF Chef You will find this tape on the roof of the northernmost skyscraper.
The City Classifieds - Sex Ed in the Time of THV This tape is in a small box which you can find on top of the 'Walnut' Windmill (2).
The City Classifieds - The Cable Guy You can get here during the "Carriers" side quest or later. Before that, you won't be able to get here.
Tourism Office of Villedor - Sain Paul Cathedral
Tourism Office of Villedor - Villedor's Castle It's in the room at the top of Wharf Water Tower (2).
Tourism Office of Villedor - VNC Tower
Unit 404: Evacuation You will receive this tape automatically when you come here to complete the side quest "Wall of Valor: Bad Medicine".
Unit 404: Trapped You will receive this tape automatically when you come here to complete the side quest "Wall of Valor: Trapped".
Unit 404: Weakest link You will receive this tape from Cyra when you return to her to complete the quest "Wall of Valor: Missing in Action".
Villedor Newscast #1
Villedor Newscast #2 The tape is located on the upper floor of Sowa Tower. To get here you have to get on the rooftop of the VNC Tower and use a paraglider. If you have the "Wall Run Jump" skill then you don't have to aim at windows, you can land on the flat part of the skyscraper below - this should be much easier.
Villedor Newscast #4 If the district is assigned to the Peacekeepers then you will find this tape lying on a table inside Pumpkin Farm / Rooftop Outpost settlement. If the district is assigned to the Survivors then ...
Waltz's Chamber Recording #1 You will be able to visit this place after the conversation with Colonel, which will take place during the main quest "Now or Never".
Waltz's Chamber Recording #2 You will be able to visit this place after the conversation with Colonel, which will take place during the main quest "Now or Never".
Waltz's Chamber Recording #3 You will be able to visit this place after the conversation with Colonel, which will take place during the main quest "Now or Never".
There are 117 Mementos in Dying Light 2. Finding all Memento Notes unlocks the "Archivist" achievement / trophy.
A Modern Children's Story - Monsters are Real The note is located in a room on the upper floor of the building on which the 'Ash' Windmill (3) stands.
A post from someone looking for scissors This one is inside a truck standing in a small camp on a section of a destroyed overpass.
A posting from someone looking for A and E keys A note pinned to the message board located outside the Fish Eye Canteen.
A posting from someone looking for a stapler
Airship trip over Villedor It's inside a small box at the very top of the "Fish Eye Canteen".
Atom's Dog Tag Finding this tag is the objective of the "Wall of Valor: Trapped" side quest.
Avery's Map You can find this map while doing the "To Kill or Not to Kill (2)" side quest.
Brasco's Dog Tag Finding this tag is the objective of the "Wall of Valor: Trapped" side quest.
Chris's Dog Tag You can find this marker while doing the "Broadcast" main quest. To do this, search the corpse of the turned Chris after you kill him trying to restore the power supply.
Concert Ticket for Lil' Fell
Concert Ticket for Outrageous T.H.V.
Concert Ticket for Silencio If the camp is occupied by Peacekeepers then the ticket sits on the shelf. ...
Conspiracy Theories It's inside the Nightrunner's Hideout (6).
Hicks's Dog Tag You will find this tag during the main story quest "Broadcast". You cannot miss it.
Hudson's Dog Tag You will find this tag during the main story quest "Broadcast". You cannot miss it.
Infected Playing Card - Ace of Clubs - Howler
Infected Playing Card - Ace of Diamonds - Revenant You visit this place during the "Orders" main story quest.
Infected Playing Card - King of Clubs - Rampage
Infected Playing Card - King of Diamonds - Bolter
Infected Playing Card - King of Hearts - Viral
JACEX VIDEO DELIVERY It's inside the bus suspended above the street.
Kiddie's Dog Tag It's inside GRE Vaccine Lab (2). Finding this tag is the objective of the "Wall of Valor: Bad Medicine" side quest.
Lawan's death list (Location #1) It's one of two places where you can find this memento. On a crate in the last room as you leave the church during the quests "Nightrunners" or "Deals with the Devil", but only if Hakon is still alive.
Lawan's death list (Location #2) Outside Fish Eye Canteen. It's one of two places where you can find this memento. Where you find it depends on how Hakon's fate unfolds. You will be able to find the memento as you get closer to the end of the main storyline.
Leon's Dog Tag In the basement of VNC Tower. Finding this tag is the objective of the "Wall of Valor: Missing in Action" side quest.
Letter - Katia's Choice Use the paraglider to get from the roof of the VNC Tower to the flat section several floors below the roof of this skyscraper.
Letter - Never Let Her Go The letter is located in a room on the second floor of the building from the top.
Letter from H to L You will find this tag during the main story quest "The Shoe". You cannot miss it.
Liam's Drawing #1 You will find this drawing during the quest "The Deserter (3)".
Liam's Drawing #2 You will find this drawing near (outside) the building where Bart is hiding when you do the quest "The Deserter (3)".
Liam's Drawing #3 Can be found on a couch in the apartment during "The Deserter (3)" side quest.
Liam's Drawing #4 Can be found on a couch in the apartment during "The Deserter (3)" side quest.
Liam's Drawing #5 This drawing can be found on the floor of the apartment. You will visit this location during "The Deserter (3)" side quest.
Little Ron's Dog Tag It's inside GRE Vaccine Lab (2). Finding this tag is the objective of the "Wall of Valor: Bad Medicine" side quest.
Mia's Birthday Photograph You will find this photograph during the main quest "X13".
Newspaper Article - December 23rd, 2021
Newspaper Article - January 23rd, 2022
Newspaper Article - June 9th, 2022 You can collect this newspaper during the main quest "Broadcast" or later (Use the paraglider to get from the roof of the VNC Tower to the roof of the smaller building on the east side and then jump back to the main building).
Newspaper Article - March 21st, 2023 The newspaper is located inside the military container standing on the roof of the building. You can get here from inside the Dark Hollow (2). The easiest way to get here is to use the ladder that will be next to the son you found at the end of the "Crystal White (2)" side quest.
Newspaper Article - November 11th, 2024 You will find this newspaper on a table in an abandoned restaurant.
Paradise Lost, Book IV An alternative place where you can find this book if you didn't collect it during the prologue. It's on the table, inside the Chapel of the Resurrection.
Playing Card - Joker - Steve's business card You will find it during "The Deserter (3)" side quest.
Recipe: Polish 'Pyzy' This recipe is in the container you will find on top of the tall smokestack.
Recipe: Polish Bigos This recipe is in the crate you will find on top of the tall smokestack.
Recipe: Polish Pierogi
Rowe's Dog Tag You will find this tag during the main story quest "Broadcast". You cannot miss it.
Safe Code (10-10-10) It's on a shelf inside a military container. Hint: The Answer to the Ultimate Question of Life, the Universe and Everything [in binary]. It's 42 decimal so 101010 binary.
Safe Code (10-28-64) The note with the code is in the metal cabinet. Hint: Little Boy - Length [feet] - Diameter [inches] - Filling weight [kg]
Safe Code (3-1-3) It's in the highest building in the Downtown Thugs (3) bandit camp.
Safe Code (3-1-4) You will find the code note in one of the rooms of the Garrison Electrical Station (3). Hint: Approximate number of pi.
Safe Code (4-4-4) The container with the code note is located at the very top of the Church of Saint Thomas the Apostle tower.
Safe Code (4-5-9) You will find it under the counter of the old bar. Hint: Absolute zero [*F]
Safe Code (6-6-6) This note is located in a small room slightly below the roof of the VNC Tower building. To get there you can drop down from the roof. Hint: If u 555, then I'm ...
Safe Code (74-17-76) This one is on the table in a small camp on a section of a destroyed overpass. Hint: Date of the announcement of the US Declaration of Independence [US]
Safe Code (85-19-45) It's inside a military container. Hint: End of World War 2 [EU]
Safe Code (9-6-6) Hint: Baptism of Poland
Safe Code (9-8-7) It's inside a small safe which is inside the Dark Hollow (3). This safe can be lockpicked.
Second page of a comic book It's in the Metro: Downtown Court (Story). In the room with bed and stash.
Sierra’s Dog Tag It's inside GRE Vaccine Lab (2). Finding this tag is the objective of the "Wall of Valor: Bad Medicine" side quest.
The 'Aiden' Warning The note is located in the Garrison Heights (4) bandit camp, on the same level as the footbridge between the towers.
The (end of) Times issue #2
The (end of) Times issue #3 It's in the room on top of the Saint Paul Water Tower (5).
The Ambush Tactic
The Catacombs It's a reward for completing the "History Quiz (2)" side quest.
The Center Sweep
The Central Loop Clear and Hold You visit this place during the "Orders" main story quest.
The Elias Inquiry You will visit this place during the "Renegades" side quest.
The Fortify and Await Note It sits on a wooden crate in the central part of Heron Renegados (6) bandit camp.
The Gospel of Harran On an altar in a small shed.
The Kill Order
The official Metro map from Villedor City Transportation You will arrive here when you fast travel to PK Floating Fortress.
The Pilgrim Warrant It's in the Downtown Thugs (3) bandit camp.
The Power Outage Mandate
The Tunnel Assignment You will visit this place during the "Let's Waltz!" main story quest.
Third page of a comic book
Veronica Ryan's Commendation You will get it during the main quest "Veronica". Can't be missed.
VNC Tower Blueprints You will receive this from Rowe during the "Broadcast" quest, while talking to him on the eighth floor of the VNC Tower. You will also receive a GRE Detector from him at the same time.
Wedding Invitation It sits on the piano inside the church.
Wierzbowski's Dog Tag You will find this tag during the main story quest "Broadcast". You cannot miss it.
X13 child's letter to his mom It can be found in one of the hospital rooms during the "X13" quest.
X13 child's poem addressed to Dr. Waltz It can be found in one of the hospital rooms during the "X13" quest.
X13 Medical Chart: Charles It can be found in one of the hospital rooms during the "X13" quest.
X13 Medical Chart: Gabriel It can be found in one of the hospital rooms during the "X13" quest.
X13 Medical Chart: Oskar It can be found in one of the hospital rooms during the "X13" quest.
X13 Medical Chart: Petra It can be found in one of the hospital rooms during the "X13" quest.
X13 Medical Chart: Wayne It can be found in one of the hospital rooms during the "X13" quest.
X13 Medical Chart: Wendy It can be found in one of the hospital rooms during the "X13" quest.
Red Duck #2 The code that will allow you to open the safe is: 10-28-64.
Red Duck #3 This safe is in a truck standing in a small camp on a section of a destroyed overpass. The code that will allow you to open the safe is: 74-17-76.
Red Duck #4 The safe is located in the military container. The code that will allow you to open the safe is: 10-10-10.
Red Duck #5 The safe is in the Nightrunner's Hideout (3). The code that will allow you to open the safe is: 9-6-6.
Red Duck #6 The safe is located in the military container. The code that will allow you to open the safe is: 85-19-45.
Red Duck #7 The safe is located in the back of the old bar. The code that will allow you to open the safe is: 4-5-9.
Black Duck #2 It's inside the guard tower.
Black Duck #3 The safe with this black duck is located in a small room slightly below the roof of the VNC Tower building. To get there you can drop down from the roof. The code that will allow you to open the safe is: 6-6-6.
Black Duck #4 This duck is inside the trunk of a sunken police car north of GRE Anomaly C-A-83 (3).
Black Duck #5 This duck is sitting on a mooring hook.
There are 17 Windmills in total in Dying Light 2, 10 of which are in Central Loop. Windmills are a parkour challenges that require you to climb to the top of the windmill. Finding and activating all Windmills unlocks the "Don Quixote" achievement / trophy.
'Ash' Windmill (3) Stamina: 200+
'Cedar' Windmill (3) Stamina: 200+
'Elm' Windmill (2) Stamina: 160+. Paraglider required.
'Hickory' Windmill (3) Stamina: 200+
'Juniper' Windmill (3) Stamina: 200+
'Magnolia' Windmill (2) Stamina: 160+
'Pine' Windmill (2) Stamina: 160+
'Spruce' Windmill (5) Stamina: 400+. Grappling hook required.
'Teak' Windmill (4) Stamina: 300+
'Walnut' Windmill (2) Stamina: 160+
An Exemplary Grandson (2) Rewards: ...
Birdwatching (2) Rewards: 1,250 Combat XP, 3,750 Parkour XP.
Book Club I (3)
Closure (5) (Night) Rewards: 4,500 Combat XP, 1,500 Parkour XP, Jewlery (Rare Valuable).
Could You Repeat (6) Rewards: 5,250 Combat XP, 1,750 Parkour XP, 3 x DIY Grenade.
Crystal White (2) Rewards: 1,500 Combat XP, 1,500 Parkour XP, 3 x Regeneration Booster, 500 Old World Money.
Deep Cover (3) Rewards: ...
Den for Brigitte (3) Rewards: 400 Old World Money.
Foster Family (2) Rewards: 2,250 Combat XP, 750 Parkour XP.
Garlic and Sardines Challenge (2) Rewards: Parkour Manual (Unique Valuable).
Goats Galore Quiz (1) Rewards: 400 Old World Money.
History Quiz (2) Rewards: The Catacombs (Memento), 400 Old World Money. Correct answers are: 1. The chemical bombings of 2025.; 2. The army killed 64 civilians protesting against disarming them.; 3. Spring 2014.
Hooked on the Thrill Challenge (3) Rewards: Parkour Manual (Unique Valuable).
It's Alive! (3) Rewards: ...
Missy (1) (PK)
Moonshine (3)
Paraglider City Tour Challenge (3) Rewards: Parkour Manual (Unique Valuable).
Persons of Interest Quiz (1) Rewards: Villedor Newscast #4 (Tape), 200 Old World Money. Correct answers are: 1. Dodger, 2. Thalia, 3. Her father, 4. Professor.
Rats in the House (2) Rewards: 750 Combat XP, 2,250 Parkour XP, Old World Whiskey (Unique Valuable).
Satellite Dream (5) Rewards: 1,500 Combat XP, 1,000 Parkour XP.
Sister Act (3) Rewards: 1,500 Combat XP, 1,500 Parkour XP, UV Bar, ...
The Baba I (3) Rewards: 500 Combat XP, Toughness Booster, 250 Old World Money.
The Black Widow (3)
The Deserter (3)
The Fortune Teller (5) Rewards: Crystal Ball (Artifact Valuable).
The Hunter (1) Rewards: Pattison's Chipper Chirper (Unique Valuable).
The Knick (5) (Night) Rewards: ...
The Reddest Red (3) Rewards: Can Opener (Rare Weapon)
To Kill or Not to Kill (2) Talk to Paul inside the Fish Eye Canteen. Rewards: 2,250 Combat XP, 750 Parkour XP, ....
Undying Affection (3) Rewards: 3,000 Parkour XP, UV Bar.
Wall of Valor Wall of Valor: Bad Medicine (3) Wall of Valor: Deadly Exchange (4) Wall of Valor: Lost Transmission (6) Wall of Valor: Missing in Action (6)
There are 6 GRE Quarantine Buildings in Dying Light 2. You may find a total of 24 inhibitors stored there. Collecting all these inhibitors unlocks the "Can't You Read the Signs?" achievement / trophy.
GRE Experimental Research (3) Rewards: 2,500 Combat XP, 2,500 Parkour XP, 4 x Inhibitor.
GRE Vaccine Lab (2) Rewards: 1,500 Combat XP, 1,500 Parkour XP, 4 x Inhibitor.
THV Advanced Care (5) Rewards: 3,000 Combat XP, 3,000 Parkour XP, 4 x Inhibitor.
THV-GenMod Development Center (4) Rewards: 2,500 Combat XP, 2,500 Parkour XP, 4 x Inhibitor.
There are 12 GRE Anomalies in Dying Light 2. Finding and clearing all GRE Anomalies unlocks the "Revenants" achievement / trophy
GRE Anomaly C-A-23 (5)
GRE Anomaly C-A-34 (5)
GRE Anomaly C-A-55 (3)
GRE Anomaly C-A-56 (5)
GRE Anomaly C-A-67 (5)
GRE Anomaly C-A-78 (3)
GRE Anomaly C-A-79 (2)
GRE Anomaly C-A-83 (3)
GRE Anomaly C-A-91 (4)
There are 7 Facilities (Water Towers & Electrical Stations) in Dying Light 2. Finding and assigning all Facilities unlocks the "Municipal Services" achievement / trophy.
Downtown Electrical Station (2) You will restore it during the main story mission "A Place To Call Home".
Garrison Electrical Station (3) You will restore it during the main story mission "Broadcast".
Saint Paul Electrical Station (3)
Saint Paul Water Tower (5)
Wharf Water Tower (2)
Military Airdrop THB-1L0 (4)
Military Airdrop THB-1N4 (3)
Military Airdrop THB-4UL (3) Grappling hook required.
Military Airdrop THB-7U3 (3) Paraglider required.
Military Airdrop THB-FH3 (2)
Military Airdrop THB-G3T (3) Paraglider required.
Military Airdrop THB-M30 (3) Paraglider required.
Military Airdrop THB-NW4 (2)
Military Airdrop THB-R31 (4)
Military airdrop THB-UT0 (3) Paraglider required.
Military Airdrop THB-V3P (6)
Sunken Airdrop
Sunken Airdrop
Sunken Airdrop
Sunken Airdrop
Sunken Airdrop
Sunken Airdrop
Sunken Airdrop
Sunken Airdrop
Sunken Airdrop
Sunken Airdrop
Sunken Airdrop
Sunken Airdrop
Broadcast Antena
Historical Communications Tower (3)
Newfound Land Military Relay (6)
North Loop Radio Tower (3) Grappling Hook required.
South Loop Radio Tower (6)
Bicycle (4) You must collect all 7 Red Ducks to be able to play this challenge.
Garlic and Sardines (2) Part of the "Garlic and Sardines Challenge (2)" side quest.
Hooked on the Thrill (3) Part of the "Hooked on the Thrill Challenge (3)" side quest.
Nightrunner Trial III (4)
Nightrunner Trial IV (3)
Nightrunner Trial IX (3)
Nightrunner Trial V (2)
Nightrunner Trial VI (2)
Nightrunner Trial VII (2)
Nightrunner Trial VIII (2)
Nightrunner Trial X (3)
Paraglider City Tour (3) Part of the "Paraglider City Tour Challenge (3)" side quest.
Hangar (4) You must collect all 5 Black Ducks to be able to play this combat challenge.
There are 4 Bandit Camps in Dying Light 2, 3 of which are located in Central Loop. Finding and clearing all Bandit Camps unlocks the "Ban Hammer" achievement / trophy.
Downtown Thugs (3) Rewards: 3,000 Combat XP, 1,000 Parkour XP, The Sign (3 - Artifact 2H Axe).
Garrison Heights (4) Rewards: 3,750 Combat XP, 1,250 Parkour XP, Railing (4 - Artifact 2H Hammer).
Heron Renegados (6) Rewards: 5,250 Combat XP, 1,750 Parkour XP, Motorhead (6 - Artifact 2H Mace).
Metro: Cathedral (3) (Night) Overrun by infected.
Metro: Downtown Court (Story) Automatically unlocked after completing the main story quest - "Let's Waltz".
Metro: King William Bridge (2) Occupied by Renegades.
Metro: Newalls Crossing (2) (Night) Overrun by infected.
Metro: South Loop (5) Occupied by Renegades.
Metro: VNC Tower (4) Occupied by Renegades.
Metro: Waterside (2) (Night) Overrun by infected.
Kurt's Safehouse
Lawan's Rooftop
Nightrunner's Hideout (2)
Nightrunner's Hideout (2)
Nightrunner's Hideout (2)
Nightrunner's Hideout (2)
Nightrunner's Hideout (3)
Nightrunner's Hideout (3) You will reach this place with Lawan shortly after you complete the main quest "Broadcast".
Nightrunner's Hideout (3)
Nightrunner's Hideout (3)
Nightrunner's Hideout (3)
Nightrunner's Hideout (3)
Nightrunner's Hideout (4)
Nightrunner's Hideout (5)
Nightrunner's Hideout (5)
Nightrunner's Hideout (5)
Nightrunner's Hideout (6)
VNC Tower - Lobby
VNC Tower - Terrace
Forsaken Store (2)
Forsaken Store (2)
Forsaken Store (2)
Forsaken Store (2)
Forsaken Store (2)
Forsaken Store (2)
Forsaken Store (3)
Forsaken Store (3)
Forsaken Store (3)
Forsaken Store (3)
Forsaken Store (3)
Forsaken Store (5)
Forsaken Store (5)
Dark Hollow (2)
Dark Hollow (2)
Dark Hollow (2)
Dark Hollow (2)
Dark Hollow (2)
Dark Hollow (2)
Dark Hollow (2)
Dark Hollow (2)
Dark Hollow (3)
Dark Hollow (3)
Dark Hollow (3)
Dark Hollow (3)
Dark Hollow (3)
Dark Hollow (3)
Dark Hollow (3)
Evacuation Convoy (2)
Evacuation Convoy (2)
Evacuation Convoy (2)
Evacuation Convoy (2)
Evacuation Convoy (3)
Evacuation Convoy (3)
Evacuation Convoy (3)
Military Convoy (2)
Military Convoy (2)
Military Convoy (2)
Military Convoy (2)
Military Convoy (3)
Military Convoy (3)
Military Convoy (3)
Military Convoy (5)
Military Convoy (5)
Artist Workshop Accessible with no need to unlock.
Artist Workshop / Uniform Workshop To unlock this settlement you have to activate the 'Walnut' Windmill (2).
Artist Workshop / Uniform Workshop To unlock this settlement you have to activate the 'Pine' Windmill (2).
Artist Workshop / Uniform Workshop To unlock this settlement you have to activate the 'Elm' Windmill (2).
Artist Workshop / Uniform Workshop To unlock this settlement you have to activate the 'Juniper' Windmill (3).
Artist Workshop / Uniform Workshop To unlock this settlement you have to activate the 'Spruce' Windmill (5).
Bakery / Smokehouse To unlock this settlement you have to activate the 'Walnut' Windmill (2).
Bakery / Smokehouse To unlock this settlement you have to activate the 'Elm' Windmill (2).
Bakery / Smokehouse To unlock this settlement you have to activate the 'Hickory' Windmill (3).
Bakery / Smokehouse To unlock this settlement you have to activate the 'Ash' Windmill (3).
Pumpkin Farm / Rooftop Outpost To unlock this settlement you have to activate the 'Walnut' Windmill (2).
Pumpkin Farm / Rooftop Outpost To unlock this settlement you have to activate the 'Pine' Windmill (2).
Pumpkin Farm / Rooftop Outpost To unlock this settlement you have to activate the 'Pine' Windmill (2).
Pumpkin Farm / Rooftop Outpost To unlock this settlement you have to activate the 'Elm' Windmill (2).
Pumpkin Farm / Rooftop Outpost To unlock this settlement you have to activate the 'Teak' Windmill (4).
Pumpkin Farm / Rooftop Outpost To unlock this settlement you have to activate the 'Spruce' Windmill (5).
Rooftop School To unlock this settlement you have to activate the 'Pine' Windmill (2).
Rooftop School / Cadet Academy To unlock this settlement you have to activate the 'Walnut' Windmill (2).
Rooftop School / Cadet Academy To unlock this settlement you have to activate the 'Walnut' Windmill (2).
Rooftop School / Cadet Academy To unlock this settlement you have to activate the 'Juniper' Windmill (3).
Rooftop School / Cadet Academy To unlock this settlement you have to activate the 'Cedar' Windmill (3).
Rooftop School / Cadet Academy To unlock this settlement you have to activate the 'Ash' Windmill (3).
Trading Post Accessible with no need to unlock.
Trading Post / Brewery To unlock this settlement you have to activate the 'Walnut' Windmill (2).
Trading Post / Brewery To unlock this settlement you have to activate the 'Pine' Windmill (2).
Trading Post / Brewery To unlock this settlement you have to activate the 'Elm' Windmill (2).
Trading Post / Brewery To unlock this settlement you have to activate the 'Teak' Windmill (4).
Trading Post / Brewery To unlock this settlement you have to activate the 'Spruce' Windmill (5).
Inhibitor x 1 It's in the same crate as the Military Airdrop THB-1L0 (4).
Inhibitor x 1 It's outisde the building, on one of the red platforms.
Inhibitor x 1 It's in the Metro: Waterside (2) (Night) station. On the table in the room with bed and stash.
Inhibitor x 1 It's in a small safe. The code needed to open the safe is 3-1-3.
Inhibitor x 1 In one of the rooms in the lower part of the building you will visit on your way to the top.
Inhibitor x 1 The crate is in the room on top floor of the building.
Inhibitor x 1 The inhibitor can be found in the Military Airdrop THB-NW4 (2) crate.
Inhibitor x 1 The crate is located in a room on the top floor of the building.
Inhibitor x 1 It's inside the Dark Hollow (3).
Inhibitor x 1 The crate is located in a small room slightly below the roof of the VNC Tower building. To get there you can drop down from the roof.
Inhibitor x 1 The crate is in the Saint Paul Electrical Station (3) building, in a flooded room on the lowest level.
Inhibitor x 1 It's inside the Metro: Newalls Crossing (2) (Night) station.
Inhibitor x 1 The safe containing the inhibitor is in a room at the top of the church tower. The code to open it is 4-4-4.
Inhibitor x 1 It's in the Metro: King William Bridge (2) station. On the table in the room with bed and stash.
Inhibitor x 1
Inhibitor x 1
Inhibitor x 1 It's in the river, under the bridge.
Inhibitor x 1 It's in the river, near the bridge.
Inhibitor x 1 It's inside the Military airdrop THB-UT0 (3) crate.
Inhibitor x 1 It's in the Metro: VNC Tower (4) station. On the table in the room with bed and stash.
Inhibitor x 1 It's in the Metro: Cathedral (3) (Night) station. In the room with bed and stash.
Inhibitor x 1 It's in a safe. The code you need to open the safe is: 9-8-7.
Inhibitor x 1 It's in the same crate as the Military Airdrop THB-4UL (3).
Inhibitor x 1 It's in a small safe. Code is 3-1-4.
Inhibitor x 1 It's in the Metro: South Loop (5) station. In the room with bed and stash.
Inhibitor x 1 The crate is under the bridge.
Inhibitor x 1
Inhibitor x 1
Inhibitor x 1
Inhibitor x 1 The crate is in the basement. The entrance is in the main building.
Inhibitor x 1
Inhibitor x 1
Inhibitor x 1
Inhibitor x 2 GRE Anomaly C-A-83 (3)
Inhibitor x 2
Inhibitor x 2 GRE Anomaly C-A-79 (2)
Inhibitor x 2 In the Metro: Downtown Court (Story).
Inhibitor x 2 GRE Anomaly C-A-78 (3)
Inhibitor x 2 You visit this place during the "Orders" main story quest.
Inhibitor x 2 GRE Anomaly C-A-91 (4)
Inhibitor x 2 GRE Anomaly C-A-55 (3)
Inhibitor x 2 GRE Anomaly C-A-67 (5)
Inhibitor x 2
Inhibitor x 2 GRE Anomaly C-A-34 (5)
Inhibitor x 2
Inhibitor x 2 GRE Anomaly C-A-23 (5)
Inhibitor x 2 GRE Anomaly C-A-56 (5)
Inhibitor x 3 The crate is located in the bedroom of Lawan's apartment. You will get here while doing the main quest "The Shoe".
Inhibitor x 3 The crate is located on the top floor of a 'side' skyscraper. you will get here while doing the main quest "Broadcast".
Inhibitor x 4 GRE Vaccine Lab (2)
Inhibitor x 4 GRE Experimental Research (3)
Inhibitor x 4 THV-GenMod Development Center (4)
Inhibitor x 4 THV Advanced Care (5)
Car Factory
Chapel of the Resurrection
Church of Saint John of God
Church of Saint Thomas the Apostle
Culvert Island
Dam
Metropolitan Art Gallery
Mount Lucid Observatory
Saint Paul Cathedral
VNC Tower
Downtown (2-3)
Garrison (3-4)
Lower Dam Ayre (5-6)
Muddy Grounds (2-3)
New Dawn Park (2-3)
Newfound Lost Lands (5-6)
Saint Paul Island (3-4)
The Wharf (2-3)
David Miller brings 15 years of experience in global economics, personal finance strategy, and market dynamics. He specializes in turning complex economic trends into actionable insights for everyday readers.
