
Saints Row Map - Santo Ileso

Start Here You Begin Your Adventure After Completing the Prologue. the Apartment This Apartment Will Be Your Headquarters for the First Few Missions. the...
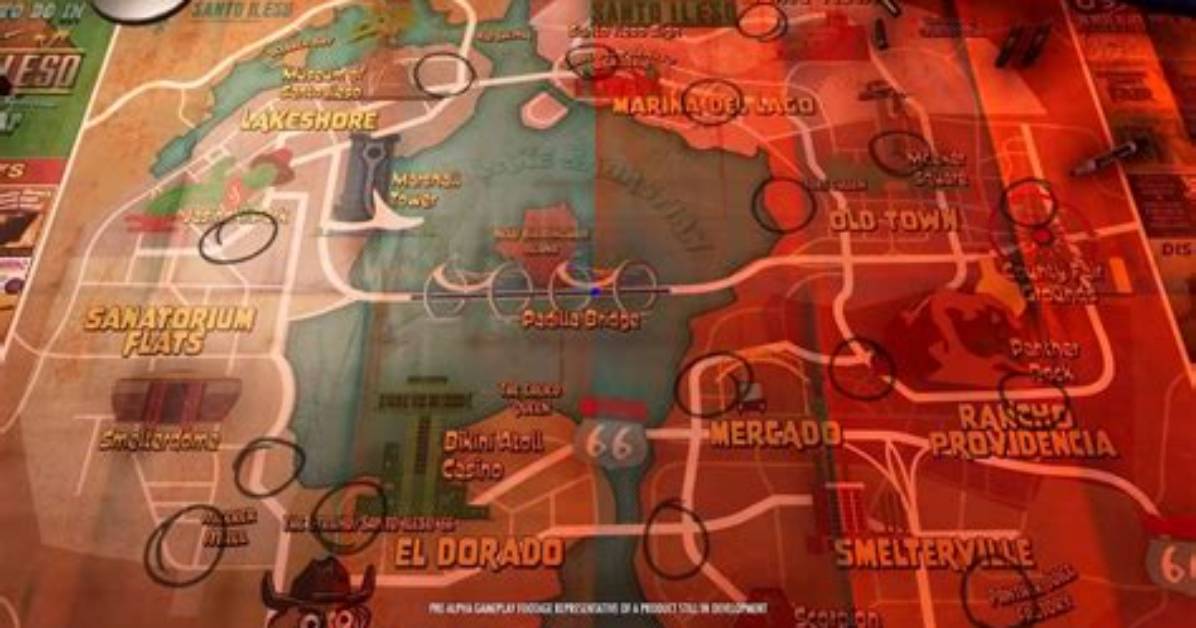
Start Here you begin your adventure after completing the prologue.
The Apartment This apartment will be your headquarters for the first few missions.
Must Read
The Church Your headquarters for most of the game.
Find and photograph Fast Travel locations to unlock them on your map. Then you will be able to fast travel to them from anywhere on the map.
Bear Lake Fast Travel
Cactus Bill Fast Travel
El Dorado Fast Travel
Lone Wolf Fast Travel
Panther Rock Fast Travel
Twin Coyote Fast Travel
Collectibles are special objects that you can photograph and use as decorations in your HQ - The Church. You will be able to do this after completing the mission "Office Décor".
Anchor Sculpture Small.
Ancient Vase Small.
As Seen on TV Knife Small. It's a mission reward - "Idol Hands".
Atlas Statue Large.
Bear Rug Wall.
Bowling Balls and Pin Medium.
Brewery Tank Medium.
Bronze Arm Medium.
Bronze Buffalo Medium.
Bronze Feather Medium.
Bug Statue Medium.
Cabbit Small. It's inside an open garage.
Caca Cabana Medium. It's a mission reward - "Idol Threat".
Cactus Cowboy Large.
Cactus Flower Small.
Cactus Jack Medium. It's a mission reward - "Art Appreciation".
Cactus Santa Small.
Calico Queen Sign Wall.
Campfire Silhouette Wall.
Captain Eagle Statue Large.
Carrot Head Medium.
Cat Herder Wall.
Cemetery Angel Medium.
Centerpiece Bowl Small.
Chalupacabra Sign Wall. It's a reward for completing the "Chalupacabra" criminal venture.
City Hall Fountain Medium.
Classy Flamingo Small.
Compass Medium.
Cow Statue Medium. It's a mission reward - "Art Appreciation".
D20 Medium. It's a reward for completing the "Castle Kraken" criminal venture.
Devil's Egg Large. It unlocks with DLC.
Doc Ketchum's Horse Medium. Boot Hill reward. (Bugged?)
Drug Shipment Small. Drug Pallet Pickup reward. You have to collect all Drug Pallet Pickups.
Dustlander Throne Medium. It's a mission Reward - "Unto the Breach".
El Bar Visual Sign Wall.
Fanciful Map Wall.
Flower Spur Statue Medium. It's also a mission reward - "Art Appreciation".
Fox Tails Sign Wall.
Gas Pump Medium.
Gatling Gun Medium. It's a mission Reward - "Severance Package".
Giant Golf Ball Large.
Go-Kart Trophy Small. Pony Express Reward. Complete all 12 Pony Express side hustles.
Gold Disc Golf Basket Medium.
Golden Armadillo Medium.
Golden Helmet Statue Medium.
Golden Shitter Small.
Golden Stag Medium.
Golden Urinal Medium.
Grisly Bear Large.
Guitar Guy Statue Medium.
Helm Small.
Horse Sculpture Medium.
Hoverboard Trophy Small. Eurekabator! reward. Complete Eurekabator! criminal venture.
Hummingbird Codex Small. It's a mission reward - "Going Overboard".
I Heart Santo Ileso Medium.
Ice Cream Statue Large.
Interstellar Phone Booth Medium. It's a reward for completing the "Laundromat" criminal venture.
Jackalope Medium.
JimRob Statue Large. It's a reward for completing the "JimRob's Garage" criminal venture.
Joe Cola Sign Wall.
KAKTS Radio Tower Large. It's a reward for completing the "KAKTS Radio" criminal venture.
Knight Medium.
Liquor Bottle Large.
Lit Chick Large. It unlocks with DLC.
Marble Small.
Mechaburger Stand Medium.
Metal Coyote Large.
Metal Jackalope Sculpture Medium.
Metal Rabbit Large.
Metal Sun Man Statue Medium.
Metal Vulture Large.
Mine Cart Medium. It's in the mine under the hill. The mine can be accessed through one of four tunnels. The entrances to them are from the south, east and west.
Model Plane Small.
Novelty Cowboy Hat Large.
Nuke Mount Medium. It's a reward for completing "The Big One" criminal venture.
Oversized Boot Large.
Oversized Bullet Small.
Owl Windmill Large.
Painted Keg Small.
Piano Medium. Inside a small, wooden chapel.
Planet Saints Pedestal Small. It's a reward for completing the "Planet Saints" criminal venture.
Planetary Model Small.
Poker Chips Small.
Ramparts Plush Toy Small.
Route 66 Sign Wall.
Saddle Bar Stool Medium.
Saint Discordia Large. Saints Skyscraper reward. Build Saints Skyscraper - Complete all missions and build all criminal ventures.
Scorpion Statue Small.
Shady Oaks Sign Wall. It's a reward for completing the "Shady Oaks" criminal venture.
Shoe Light Medium.
Silver Obelisk Small.
Singing Bush Small.
Sofa King Sign Wall.
Space Ship Small.
Space Suit Medium. It's a reward for completing the "Let's Pretend" criminal venture.
Swan Float Medium.
The Great Banana Small.
The Turdis Medium.
The Varmint Sign Wall.
The Worthy Hammer Small.
Thunderpump Sign
Tipsy Lizard Sign Wall.
Tirepede Large.
Topiary Pigs Medium.
Toxic Waste Barrel Small. It's a reward for completing the "Bright Future" criminal venture.
Train Signal Medium.
Training Dummy Medium. It's a reward for completing the "First Strike Dojo" criminal venture.
Triceratops Skull Large.
Vat of Fabulous Medium. It's a reward for completing the "Cutting Edge" criminal venture.
Wanted Poster Wall. Wanted reward.
Western Chuckwagon Large.
Western Golden Cannon Medium. You will photograph it during the "Office Décor" mission.
Windmill Large.
Wormy Apple Medium. It's a mission reward - "Art Appreciation".
Wuzyerz Repo Yard Wall. It's a reward for completing the "Wuzyerz Repo" criminal venture.
Photo Hunts are a type of Discoveries available in the game. To complete it, you need to go to the marked spot and take a photo of the object located there.
10 Gallon Saloon Sign
66 West On-Ramp Mural
Badlands Watering Hole
Badlands Windmill
Bison Memorial
Boomers Sign
Bowling Pin
Cactus Mural
Dare Street Studios
FB's Burger
Flaming Hot Billboard
House Phoenix Dragon
Jackalope
Jackpot Wedding Chapel
Joe Cola Bottle Cap
La Galleria Fountain
Lariat Plaza Cowboy
Mad Cow Sign
Memorial Wall
Milk Carton
Monte Vista Market Sign
Old Railroad Water Tower
Rattle Snake
Rock 66
Rock Duet
SAD Campus Sign
Seal of the City of Santo Ileso
Skate Park Grind Rail
Smelters Helmet
Snake Oil Saloon Sign
The Barbeque Barn
The Coyote Rodeo
The Messenger
The Solar Wind
The Third Pillar
Thunderpump Sign
Tombstone Angel
A total of 30 Lost Wheels can be found in the desert areas around Santo Ileso. They are divided into six groups of 5 parts in each. Finding all the parts from one group will unlock one of the 6 unique vehicles available.
A Bike Wrapped in Mystery #1 Roll of Bandages. Collect all the parts to unlock the Widowmaker.
A Bike Wrapped in Mystery #2 Crutches. Collect all the parts to unlock the Widowmaker.
A Bike Wrapped in Mystery #3 Lightweight Frame. Collect all the parts to unlock the Widowmaker.
A Bike Wrapped in Mystery #4 Scuffed-up Front Wheel. Collect all the parts to unlock the Widowmaker.
A Bike Wrapped in Mystery #5 Scuffed-up Rear Wheel. Collect all the parts to unlock the Widowmaker.
Bones of Kavanagh County #1 1500 Horsepower Big Block Engine. Collect all the parts to unlock the Heavyweight Monster Truck.
Bones of Kavanagh County #2 Oversized, Heavy-Duty Tires. Collect all the parts to unlock the Heavyweight Monster Truck.
Bones of Kavanagh County #3 Dual Nitrous Injectors. Collect all the parts to unlock the Heavyweight Monster Truck.
Bones of Kavanagh County #4 Prehistoric Steer Skull. Collect all the parts to unlock the Heavyweight Monster Truck.
Bones of Kavanagh County #5 Titanium Roll Cage. Collect all the parts to unlock the Heavyweight Monster Truck.
Forgotten Prototype #1 Aerospace-Grade Aluminum Body. Collect all the parts to unlock the Vindicator.
Forgotten Prototype #2 Ultra Heat-Resistant Tires. Collect all the parts to unlock the Vindicator.
Forgotten Prototype #3 Rocket Engine (Right). Collect all the parts to unlock the Vindicator.
Forgotten Prototype #4 Rocket Engine (Left). Collect all the parts to unlock the Vindicator.
Forgotten Prototype #5 Shark-Fin Winglets. Collect all the parts to unlock the Vindicator.
Ghost of the Frying Dutchman #1 Wooden Hull. You need a flying vehicle to get here. Collect all the parts to unlock Frying Dutchman.
Ghost of the Frying Dutchman #2 Gunpowder Cannons. Collect all the parts to unlock Frying Dutchman.
Ghost of the Frying Dutchman #3 Fryer of the Deep. Collect all the parts to unlock Frying Dutchman.
Ghost of the Frying Dutchman #4 Ship's Helm. Collect all the parts to unlock Frying Dutchman.
Ghost of the Frying Dutchman #5 Main Mast. Collect all the parts to unlock Frying Dutchman.
Lost Conspiracies #1 Crates of Emergency Provisions. Collect all the parts to unlock Tin-Foil Potato.
Lost Conspiracies #2 Low-Tech Video Recording Suite. Collect all the parts to unlock Tin-Foil Potato.
Lost Conspiracies #3 Standard Hatchback Body. Collect all the parts to unlock Tin-Foil Potato.
Lost Conspiracies #4 Enormous Ball of Tinfoil. Collect all the parts to unlock Tin-Foil Potato.
Lost Conspiracies #5 Radio Surveillance Scanner. Collect all the parts to unlock Tin-Foil Potato.
Lost Dust Buggy #1 Yellow Racing Top. This one is located on top of the rock. The easiest way to get here is by helicopter. But you can also use the large ramp nearby to launch yourself from it into the air, preferably on a motorcycle, and then get off it at the highest point and activate the wingsuit. You can find a motorcycle in one of the tent camps located nearby. Collect all the parts to unlock the Ant.
Lost Dust Buggy #2 Hotrod Engine. This one is located on top of the stony mountain. The easiest way to get here is by helicopter. But you can also use the sloping roof of the nearby mill building which is a kind of ramp to launch yourself from it into the air, preferably on a motorcycle, and then get off it at the highest point and activate the wingsuit. You can find a motorcycle in one of the tent camps located around the mountain. Collect all the parts to unlock the Ant.
Lost Dust Buggy #3 Heavy Rear Coil Springs. Collect all the parts to unlock the Ant.
Lost Dust Buggy #4 Off-Road Tires. Collect all the parts to unlock the Ant.
Lost Dust Buggy #5 Reinforced Roll Cage. Collect all the parts to unlock the Ant.
Hidden Histories is one of the "Discovery" side activities in Saints Row Reboot. To complete a given Hidden History, you must interact with the five information boards that are located nearby.
Beware the Grisly Bear Complete this one and The Grand Prix hidden history to unlock the KISS Cactus Hat.
Fort Cullen Complete this one and the Rancho Providencia hidden history to unlock the Mask, Werewolf.
Frank's 80/20 Brewery Complete this one and the Red Faction Memorial Park hidden history to unlock the Costume, Beer.
Go Kart Go! Complete this one and Lake Alacran hidden history to unlock the Marshall Kart / Shifty.
Jasinski Park Library Complete this one and Jasinski Park Theater hidden history to unlock the Mask, Alien and the Alien Hat.
Jasinski Park Theater Complete this one and Jasinski Park Library hidden history to unlock the Mask, Alien and the Alien Hat.
Lake Alacran Complete this one and Go Kart Go! hidden history to unlock the Marshall Kart / Shifty.
Meeker Square Complete this one and the St. Thomas Corvacho hidden history to unlock the Pugnus Sanctus Dei weapon.
Rancho Providencia Complete this one and the Fort Cullen hidden history to unlock the Mask, Werewolf.
Red Faction Memorial Park Complete this one and the Frank's 80/20 Brewery hidden history to unlock the Costume, Beer.
Route 66 Cranston Complete this one and the Route 66 McQuarry hidden history to unlock the Ringers, Hawaiian Shirt.
Route 66 McQuarry Complete this one and the Route 66 Cranston hidden history to unlock the Ringers, Hawaiian Shirt.
Sidewinder Creek Complete this one and the Sky Canyon hidden history to unlock the Shakes the Snake Shirt.
Sky Canyon Complete this one and the Sidewinder Creek hidden history to unlock the Shakes the Snake Shirt.
St. Thomas Corvacho Complete this one and the Meeker Square hidden history to unlock the Pugnus Sanctus Dei weapon.
The Grand Prix Complete this one and the Beware the Grisly Bear hidden history to unlock the KISS Cactus Hat.
Places where you can find additional information panels that you must interact with to complete the Hidden History located in the area.
Drug Pallet Pickups in Saints Row are one type of Discoveries. Your task is to find the pallets and collect their contents. The pallets come in groups of three or four pallets located in close proximity to each other.
Airplane Grave Shooting Range Find and destroy targets near an old plane by a lake. Rewards: Cash: $4000; XP: 1200; Foam Finger Gun.
Bored Clerks Shooting Gallery Find and destroy targets at the gas station. Rewards: Cash: $4000; XP: 1200; MDI-36 Tac Pistol.Bored Clerks Shooting Gallery.
Destroy Alien Invaders Find and destroy targets near Cranston Dam. Rewards: Cash: $4000; XP: 1200; Saints Lawgiver.
Junkyard Shooting Gallery
Old West Shooting Gallery Find and destroy targets in an old ghost town. Rewards: Cash: $4000, XP: 1200; 1848 Cavalry Revolver.
Twin Coyote Shooting Gallery
Dumpster Diving is one of the "Discovery" side activities in Saints Row Reboot. It's a very simple activity that involves finding a gold glowing trash dumpster and searching it. These dumpsters can hold money, experience, clothing items, weapon skin, and parts of the Golden Garbage Truck.
Badlands North Dumpster - High-Capacity Hopper In this dumpster you will find one of the four parts of the Golden Garbage Truck / Sanicruiser + 50 XP.
Badlands South Dumpster 300 XP, $2,000.
East Flats Dumpster 300 XP, $2,000.
East Providencia Dumpster 300 XP, $2,000.
East Providencia Dumpster - Shoes, Tissue Box In this dumpster you will find the Shoes, Tissue Box + 50 XP.
El Dorado Dumpster 300 XP, $2,000.
Lake Sabastian Dumpster 300 XP, $2,000.
Lake Sabastian Dumpster - Hydraulic Lift In this dumpster you will find one of the four parts of the Golden Garbage Truck / Sanicruiser + 50 XP.
Lakeshore North Dumpster 300 XP, $2,000.
Lakeshore South Dumpster 300 XP, $2,000.
Marina West Dumpster - Industrial Compactor In this dumpster you will find one of the four parts of the Golden Garbage Truck / Sanicruiser + 50 XP.
Marina West Dumpster - Pizza Box Hat In this dumpster you will find the Pizza Box Hat + 50 XP.
Mercado Dumpster 300 XP, $2,000.
Old Town East Dumpster - Gold Chassis In this dumpster you will find one of the four parts of the Golden Garbage Truck / Sanicruiser + 50 XP.
Old Town West Dumpster 300 XP, $2,000.
Rojas Desert North Dumpster - Recycled SMG In this dumpster you will find the Recycled SMG weapon visual mod + 50 XP.
Smelterville East Dumpster 300 XP, $2,000.
Smelterville West Dumpster 300 XP, $2,000.
West Flats Dumpster - Garbage Bag Shirt In this dumpster you will find the Garbage Bag Shirt + 50 XP.
Rooftop Access
Rooftop Access
Rooftop Access
Rooftop Access
Rooftop Access
Weather Station
Weather Station
Weather Station
Weather Station
Weather Station
Weather Station
Weather Station
Weather Station
Weather Station
Weather Station
Weather Station
Weather Station
Weather Station It's on the roof of the building. To get here you can use another weather station, located slightly to the south.
Weather Station
Weather Station
Weather Station
Weather Station
Weather Station
Weather Station
Weather Station
Weather Station
Dance Studio
Lemoneedle
Rusty's Needle
Rusty's Needle
Friendly Fire
Friendly Fire
Friendly Fire
Friendly Fire Sells: Melee, Pistol, SMG, Rifle, Shotgun.
Friendly Fire
#Trending Sells: Bottoms, Full Body, Hands, Hats, Jackets, Left Ear, Lower Face, Necklaces, Right Ear, Shirts, Shoes, Socks, Underwear, Upper Face, Wrists.
Botas Picuda Sells: Shoes.
Branded Sells: Bottoms, Hands, Hats, Jackets, Shirts, Shoes, Socks, Upper Face, Wrists.
Buckaroo Leggings Sells: Bottoms, Full Body, Hands, Hats, Jackets, Left Ear, Lower Face, Necklaces, Shirts, Shoes, Socks, Wrists.
Deep Silver Volition Sells: Hats, Jackets, Shirts.
Dia de Muertos Sells: Full Body, Helmets, Full Face.
Dusty's Sells: Helmets, Lower Face.
Effin' Cray Socks Sells: Socks.
Everything is a Million Dollars This store unlocks after finishing the main story and is NOT needed for the achievement / trophy.
Gafas de Sol Sells: Upper Face.
Go Kart Go! Sells: Hats, Helmets, Shirts.
Impressions Sells: Bottoms, Full Body, Hands, Hats, Jackets, Necklaces, Shirt, Shoes, Socks, Upper Face, Wrists.
Kavanagh County Park Service Sells: Bottoms, Hats, Jackets, Shirts.
Kiss Me Sells: Hats, Shirts.
Leather and Lace Sells: Bottoms, Full Body, Hands, Helmets, Jackets, Lower Face, Necklaces, Shirts, Shoes, Socks, Underwear, Upper Face, Wrists.
Rampart BBQ Sells: Hats, Jackets, Lower Face, Shirts.
Rat Rods Sells: Hats, Shirts.
Ringers Sells: Hats, Shirts.
School of Art and Design Sells: Shirts, Wingsuit.
Smelter Yo Face Sells: Full Body, Hats, Helmets, Outfits.
Starmadillo Sells: Full Body, Hands, Hats, Helmets, Shirts, Underwear.
Take My Ex's Stuff Sells: Bottoms, Helmets, Shirts.
The Swole Hole Sells: Bottoms, Full Body, Hands, Hats, Helmets, Jackets, Necklaces, Shirts, Shoes, Socks, Underwear, Upper Face, Wrists.
Twin Coyote Arcade Sells: Hats, Helmets, Shirts.
Twisty Creamy Sells: Full Body, Helmets, Shirts.
Wearhard Industrial Clothing Sells: Bottoms, Full Body, Hands, Hats, Helmets, Jackets: Lower Face, Necklaces, Shirts, Shoes, Socks.
Woodbush Country Club Sells: Arms, Bottoms, Hats, Jackets, Shirts, Shoes, Socks, Upper Face.
Edith's Vision Materials are the objects that it is necessary to photograph (any 14 of them) in order to complete the "Cutting Edge" criminal venture.
Brick Material
Cactus Material
Carbon Fiber
Coin Material
Diamond Material
Galaxy Material Helipad on the rooftops of the skyscraper. Only at night.
Gold Material
Hypnosis Material
Infrared Material
Ink Blot Material
Jade Material
Kaleidoscope Material
Lava Material
Meat Material
Mirror Material
Rock Material
Rubber Material
Rust Material
Stone Material
Untextured Material
Wood Material
Threats are unlocked after completing the "Networking" main mission. They only appear after you build a criminal venture in the district which can be done through the Empire Table at your HQ.
A total of 41 side missions, so-called Side Hustles, are available in Saints Row. Completing all of them unlocks the "Always Be Hustling" achievement / trophy. 12 of them are @TCHA side hustles - Give a low star rating to the local business, and defeat the enemies who show up. Give a lower rating for a harder challenge and bigger cash and XP rewards. Giving a 4-star rating is sufficient to complete the challenge.
@TCHA (Start) The first of the @Tcha side hustles. All you have to do is talk to Sylvia and you will unlock other @TCHA side hustles this way. Kev's friend Sylvia is an account manager for a marketing firm. She's looking for some help with a social media campaign. Meet her by the public library in Mercado.
@TCHA (Badlands South) This side hustle will become available when you talk to Sylvia at @TCHA (Start). Leave a bad review for El Taco Feo and survive the fury of the Idols. Give a lower rating for a harder challenge and bigger cash and XP rewards.
@TCHA (East Flats) This side hustle will become available when you talk to Sylvia at @TCHA (Start). Leave a bad review for the Snake Oil Saloon and survive the wrath of Marshall. Give a lower rating for a harder challenge and bigger cash and XP rewards.
@TCHA (El Dorado) This side hustle will become available when you talk to Sylvia at @TCHA (Start). Leave a bad review for Foxtails and survive the fury of the Idols. Give a lower rating for a harder challenge and bigger cash and XP rewards.
@TCHA (Marina East) This side hustle will become available when you talk to Sylvia at @TCHA (Start). Leave a bad review for Vertical Slice Pizza and survive the fury of the Idols. Give a lower rating for a harder challenge and bigger cash and XP rewards.
@TCHA (Marina West) This side hustle will become available when you talk to Sylvia at @TCHA (Start). Leave a bad review for La Bodega and survive the rage of Los Panteros. Give a lower rating for a harder challenge and bigger cash and XP rewards.
@TCHA (Mercado) This side hustle will become available when you talk to Sylvia at @TCHA (Start). Leave a bad review for Batter Up Donuts and survive the fury of the Idols. Give a lower rating for a harder challenge and bigger cash and XP rewards.
@TCHA (Old Town West) This side hustle will become available when you talk to Sylvia at @TCHA (Start). Leave a bad review for the Lasso Lounge and survive the wrath of Marshall. Give a lower rating for a harder challenge and bigger cash and XP rewards.
@TCHA (Rojas Desert South) This side hustle will become available when you talk to Sylvia at @TCHA (Start). Leave a bad review for a Marshal facility and survive the wrath of Marshall. Give a lower rating for a harder challenge and bigger cash and XP rewards.
@TCHA (Smelterville East) This side hustle will become available when you talk to Sylvia at @TCHA (Start). Leave a bad review for the Panther Pride Gym and survive the rage of Los Panteros. Give a lower rating for a harder challenge and bigger cash and XP rewards.
@TCHA (West Providencia) This side hustle will become available when you talk to Sylvia at @TCHA (Start). Leave a bad review for the Santotel Motel and survive the rage of Los Panteros. Give a lower rating for a harder challenge and bigger cash and XP rewards.
A total of 41 side missions, so-called Side Hustles, are available in Saints Row. Completing all of them unlocks the "Always Be Hustling" achievement / trophy. 6 of them are Choplifting side hustles - Fly a helicopter and attach the magnet to a vehicle or payload and carry it to the destination.
Choplifting (Old Town East) This side hustle will become available when you complete the "Observe and Report" main mission. Kev's friend Hawk needs a pilot for a bank job. Meet him on the east side of Old Town. Bonus Objectives: Maintain Max Airspeed - 20s Keep the Payload Low - 20s Rewards: Cash: $4000; XP: 1200; Umbrella Rifle.
Choplifting (West Flats) This side hustle will become available when you complete the first Choplifting (Old Town East) side hustle. Hawk needs a pilot for a museum job. Meet him at the fuel terminal in Sanatorium Flats. Bonus Objectives: Maintain Max Airspeed - 30s Keep the Payload Low - 30s Rewards: Cash: $4000; XP: 1200; Googles, Aviator.
Choplifting (Smelterville West) This side hustle will become available when you complete the first Choplifting (Old Town East) side hustle. Hawk needs a pilot for a casino job. Meet him at the water bottling plant in Smelterville. Bonus Objectives: Smash Objects With Payload x 150 Total Low Flying Time - 120s Rewards: Cash: $8000; XP: 2000.
Choplifting (Badlands North) This side hustle will become available when you complete the Choplifting (West Flats) and Choplifting (Smelterville West) side hustles. Hawk needs a pilot for a tech job. Meet him at the public docks on the north side of Velasco Bay. Bonus Objectives: Maintain Max Airspeed- 30s Keep the Payload Low - 40s Rewards: Cash: $4000; XP: 1200; MDI-77 Auto Rifle.
Choplifting (El Dorado) This side hustle will become available when you complete the Choplifting (West Flats) and Choplifting (Smelterville West) side hustles. Hawk needs a pilot for an arms deal. Meet him at the Santotel in El Dorado. Bonus Objectives: Smash Objects With Payload x 100 Keep the Payload Low - 45s Rewards: Cash: $4000; XP: 1200; El Lanzador.
Choplifting (Rojas Desert North) This side hustle will become available when you complete the Choplifting (West Flats) and Choplifting (Smelterville West) side hustles. Hawk needs a pilot for a job in the desert. Meet him at the county fairgrounds parking lot. Bonus Objectives: Maintain Max Airspeed - 60s Total Low Flying Time - 100s Rewards: Cash: $4000; XP: 1200; MDI-85 Carbine.
A total of 41 side missions, so-called Side Hustles, are available in Saints Row. Completing all of them unlocks the "Always Be Hustling" achievement / trophy. 12 of them are Pony Express side hustles - Race a vehicle to a destination point. Once you get there, defeat the enemies if any are chasing you.
Pony Express (Badlands South) Kev's friend Julian started his own delivery business and needs an off-road driver. Meet him by The oil derricks in the Badlands. Bonus Objectives: Get Total Airtime - 5s Sideswipe Enemy Cars x 3 Finish with Time Left - 40s Rewards: Cash: $4000; XP: 1200.
Pony Express (Smelterville West) Kev knows this guy Emilio who's looking for a driver. Meet him by U-Store in Smelterville. Bonus Objectives: Get Total Airtime - 5s Sideswipe Enemy Cars x 3 Finish with Time Left - 40s Rewards: Cash: $4000; XP: 1200; RS Gas Buggy.
Pony Express (Rojas Desert South) Kev's friend Diamond needs a driver for an off-road smuggler's run. Meet her in the Rojas Desert. Bonus Objectives: Get Total Airtime - 9s Sideswipe Enemy Cars x 3 Finish with Time Left - 40s Rewards: Cash: $4000; XP: 1200, FB's Buggy.
Pony Express (Badlands North #2) This side hustle will become available when you complete the Pony Express (Badlands South) side hustle. Julian needs you to make another Instant Delivery. Meet him at a sketchy old feed store in the Badlands. Bonus Objectives: Get Total Airtime - 5s Sideswipe Enemy Cars x 3 Finish with Time Left - 40s Rewards: Cash: $4000; XP: 1200.
Pony Express (Badlands North) This side hustle will become available when you complete the Pony Express (Badlands South #2) side hustle. Emilio has more contraband to deliver. Meet him on the north side of Velasco Bay, across from Lakeshore. Bonus Objectives: Total Time Drifting - 3s Crush Enemy Cars x 15 Finish with Time Left - 40s Rewards: Cash: $4000; XP: 1200.
Pony Express (Badlands South #2) This side hustle will become available when you complete the Pony Express (Smelterville West) side hustle. Emilio has more contraband to deliver. Meet him at the Casino Motel on Route 66 in McQuarry. Bonus Objectives: Get Total Airtime - 5s Sideswipe Enemy Cars x 3 Finish with Time Left - 40s Rewards: Cash: $4000; XP: 1200.
Pony Express (El Dorado) This side hustle will become available when you complete the Pony Express (Rojas Desert South #3) side hustle. Diamond needs you to make another run. She's laying low at Smooth Putts Crazy Golf in El Dorado. Bonus Objectives: Get Total Airtime - 5s Sideswipe Enemy Cars x 3 Finish with Time Left - 40s Rewards: Cash: $4000; XP: 1200; Vindicator.
Pony Express (Lakeshore South) Note: Although this side hustle is located on the map in the East Flats district but it counts as a side hustle from Lakeshore South district! This side hustle will become available when you complete the Pony Express (Badlands North) side hustle. Emilio has one more special job for you. Meet him by Stillwater Canal in Lakeshore Bonus Objectives: Get Total Airtime - 5s Sideswipe Enemy Cars x 3 Finish with Time Left - 40s Rewards: Cash: $4000; XP: 1200; Schooner.
Pony Express (Monte Vista) This side hustle will become available when you complete the Pony Express (Badlands North #2) side hustle. Julian need you to make another Instant Delivery. Meet him at the Woodbush Country Club in Monte Vista. Bonus Objectives: Get Total Airtime - 5s Sideswipe Enemy Cars x 3 Finish with Time Left - 40s Rewards: Cash: $4000; XP: 1200.
Pony Express (Rojas Desert North) This side hustle will become available when you complete the Pony Express (El Dorado) side hustle. Diamond needs you to make one final run. She's camped near Sidewinder Creek in the Rojas Desert. Bonus Objectives: Get Total Airtime - 5s Do Midair Backflips x 1 Finish with Time Left - 40s Rewards: Cash: $4000; XP: 1200.
Pony Express (Rojas Desert South #2) This side hustle will become available when you complete the Pony Express (Monte Vista) side hustle. Julian need you to make one last Instant Delivery. Meet him at Cranston Dam. Bonus Objectives: Get Total Airtime - 5s Sideswipe Enemy Cars x 3 Finish with Time Left - 40s Rewards: Cash: $4000; XP: 1200; The Kingmobile.
Pony Express (Rojas Desert South #3) This side hustle will become available when you complete the Pony Express (Rojas Desert South) side hustle. Diamond needs you to make another run. Find her campsite in the Rojas Desert. Bonus Objectives: Get Total Airtime - 5s Sideswipe Enemy Cars x 3 Finish with Time Left - 40s Rewards: Cash: $4000; XP: 1200.
A total of 41 side missions, so-called Side Hustles, are available in Saints Row. Completing all of them unlocks the "Always Be Hustling" achievement / trophy. 6 of them are Riding Shotgun side hustles - Get into the passenger seat of a car driven by someone else and destroy all vehicles that follow you.
Riding Shotgun (Lakeshore South) This side hustle will become available when you complete the "Observe and Report" main mission. Kev's friend Barb needs someone to ride shotgun for a jewelry heist. Meet her at the corner of Canal and Jasinski in Lakeshore. Rewards: Cash: $4000; XP: 1200; New Vehicle Patterns.
Riding Shotgun (East Providencia) This side hustle will become available when you complete the "Observe and Report" main mission. Kev's friend knows an arms dealer who needs someone to ride shotgun. Meet him behind a trailer in Rancho Providencia. Bonus Objectives: Kill Enemy Drivers x 5 Shoot Out Enemy Tires x 4 Kill Enemies from Rooftop x 8 Rewards: Cash: $4000; XP: 1200; New Weapon Patterns.
Riding Shotgun (El Dorado) This side hustle will become available when you complete the "Observe and Report" main mission. Kev's friend Josh needs someone to ride shotgun for a drug deal. Meet him outside the Southern Stars Hotel in El Dorado. Bonus Objectives: Kill Enemy Drivers x 3 Shoot Out Enemy Tires x 4 Kill Enemies from Rooftop x 8 Rewards: Cash: $4000; XP: 1200; New Weapon Patterns, New Vehicle Patterns.
Riding Shotgun (Marina East) This side hustle will become available when you complete the Riding Shotgun (Lakeshore South) side hustle. Barb is planing a job and needs you to ride shotgun. Meet her poolside at the Sagebrush Hotel in Marina del Lago. Rewards: Cash: $4000; XP: 1200; Field Shotgun.
Riding Shotgun (Monte Vista) This side hustle will become available when you complete the Riding Shotgun (El Dorado) side hustle. Josh has a plan to settle his debts and wants you to ride shotgun. Meet him outside a house in Monte Vista. Bonus Objectives: Kill Enemy Drivers x 5 Shoot Out Enemy Tires x 6 Kill Enemies from Rooftop x 10 Rewards: Cash: $4000; XP: 1200; Beer Can Launcher.
Riding Shotgun (Smelterville West) This side hustle will become available when you complete the Riding Shotgun (East Providencia) side hustle. Davey wants to punish Los Panteros and needs you to ride shotgun. Meet him at the Ilesoil refinery in Smelterville. Bonus Objectives: Kill Enemy Drivers x 5 Shoot Out Enemy Tires x 4 Kill Enemies from Rooftop x 20 Rewards: Cash: $4000; XP: 1200; Retrowave Sniper Rifle.
A total of 41 side missions, so-called Side Hustles, are available in Saints Row. Completing all of them unlocks the "Always Be Hustling" achievement / trophy. 6 of them are Wingsuit Saboteur side hustles - Wingsuit to rooftops and place C4 charges on antennas to blow them up. Use weather stations to move between rooftops.
Wingsuit Saboteur (Smelterville East) This is the first of side hustles of this type. Complete it to unlock the next ones. Meet with a former business associate about a potential job opportunity. Rewards: Cash: $4000; XP: 1200.
Wingsuit Saboteur (East Flats) This side hustle will become available when you complete the Wingsuit Saboteur (Smelterville East) side hustle. Meet your business associate outside Animal House Pet Care & supplies in El Dorado. Bonus Objectives: Enemy Headstot Kills x 8 Triple-Kill Enemies x 1 Wingsuit Takedowns x 5 Rewards: Cash: $4000; XP: 1200; Da Vinci Wings, Leather.
Wingsuit Saboteur (El Dorado) This side hustle will become available when you complete the Wingsuit Saboteur (Smelterville East) side hustle. Meet your business associate behind Poseidon's Palace in El Dorado. Bonus Objectives: Shove-Kill Enemies x 5 Double-Kill Enemies x 5 Wingsuit Takedowns x 3 Rewards: Cash: $4000; XP: 1200.
Wingsuit Saboteur (Lakeshore North) This side hustle will become available when you complete the Wingsuit Saboteur (Smelterville East) side hustle. Meet your business associate at Star-Register Plaza in Lakeshore. Bonus Objectives: Double-Kill Enemies x 5 Melee Kill Enemies x 10 Wingsuit Takedowns x 10 Rewards: Cash: $4000; XP: 1200; Idol Mac SMG.
Wingsuit Saboteur (Marina West) This side hustle will become available when you complete the Wingsuit Saboteur (Smelterville East) side hustle. Meet your business associate behind the Corteza Luxury Apartments in Marina del Lago. Bonus Objectives: Shove-Kill Enemies x 5 Melee Kill Enemies x 10 Wingsuit Takedowns x 10 Rewards: Cash: $4000; XP: 1200; Feather Wings.
Wingsuit Saboteur (Old Town East) This side hustle will become available when you complete the Wingsuit Saboteur (Smelterville East) side hustle. Meet your business associate behind Silver City Jewelry in Old Town. Bonus Objectives: Enemy Headshot Kills x 5 Triple-Kill Enemies x 2 Wingsuit Takedowns x 8 Rewards: Cash: $4000; XP: 1200; Skin Flap Wings.
Badlands North Side Hustles x 3 Discoveries x 24
Badlands South Side Hustles x 3 Discoveries x 30 Stores x 2
East Flats Threats x 5 Side Hustles x 2 Discoveries x 6 Stores x 4
East Providencia Threats x 5 Side Hustles x 1 Discoveries x 6
El Dorado Threats x 5 Side Hustles x 4 Discoveries x 16 Stores x 3
Lake Sabastian Discoveries x 2
Lakeshore North Threats x 5 Side Hustles x 1 Discoveries x 11 Stores x 2
Lakeshore South Threats x 5 Side Hustles x 2 Discoveries x 13 Stores x 2
Marina East Threats x 5 Side Hustles x 2 Discoveries x 6 Stores x 2
Marina West Threats x 5 Side Hustles x 2 Discoveries x 13 Stores x 3
Mercado Threats x 5 Side Hustles x 2 Discoveries x 13 Stores x 3
Monte Vista Threats x 5 Side Hustles x 2 Discoveries x 11 Stores x 2
Old Town East Threats x 5 Side Hustles x 2 Discoveries x 10 Stores x 1
Old Town Shoreline
Old Town West Threats x 5 Side Hustles x 1 Discoveries x 8 Stores x 1
Rojas Desert North Side Hustles x 2 Discoveries x 32 Stores x 2
Rojas Desert South Side Hustles x 4 Discoveries x 20 Stores x 2
Smelterville East Threats x 5 Side Hustles x 2 Discoveries x 12 Stores x 3
Smelterville West Threats x 5 Side Hustles x 3 Discoveries x 7
West Flats Threats x 5 Side Hustles x 2 Discoveries x 9
West Providencia Threats x 5 Side Hustles x 1 Discoveries x 16 Stores x 3
Chloe Bennett explores the intersection of pop culture, streaming entertainment, digital trends, and contemporary lifestyle. Her weekly commentary reaches thousands of culture enthusiasts.
