
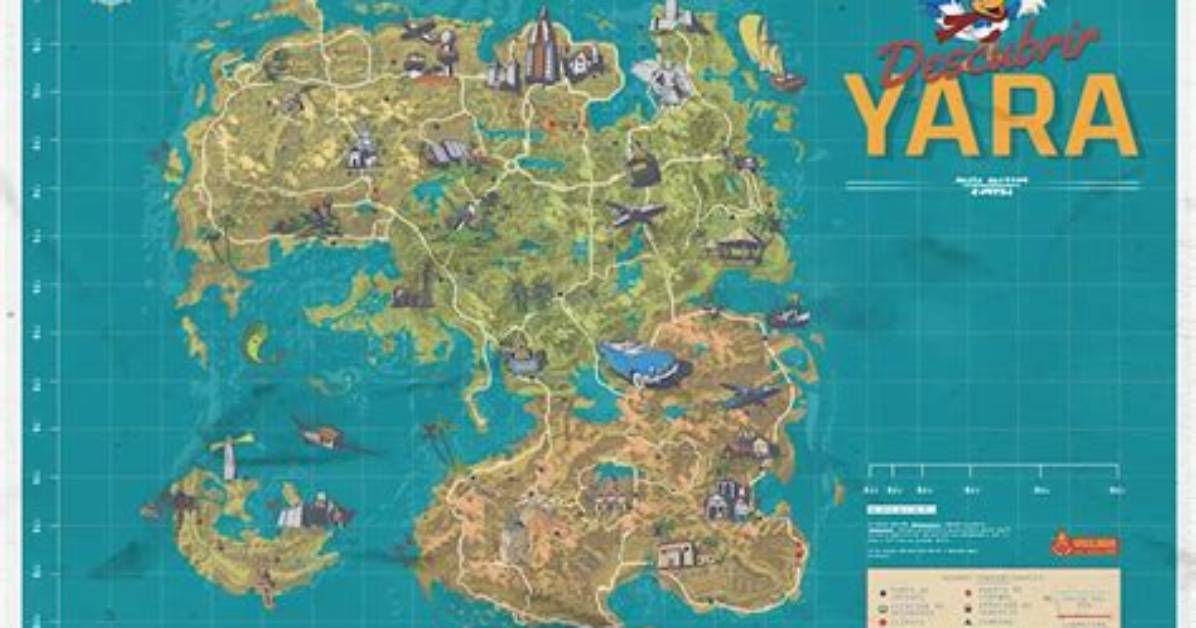
Yara, Far Cry 6 Map

Oluwa Cave Slide Start for "Slip Sliding Away" Achievement / Trophy. in Total, You Can Get Four Different Rides (Cars) in Far Cry 6. Collecting All of Them...
Oluwa Cave
Slide Start For "Slip Sliding Away" achievement / trophy.
Must Read
In total, you can get four different Rides (cars) in Far Cry 6. Collecting all of them will unlock the "Car Cry" achievement.
1962 Verrazzano Bravo To get it you should comple ANY of Gran Premio Races.
1985 Tokai Sabuku The car is in the warehouse. You can get inside by climbing on the digger which is standing at the back of the building. Inside you will have to destroy some cardboard boxes blocking the passage.
Juan's 1956 Beaumont Valentina You will receive it when you begin the "[quest]4375[/quest]" main operation.
Yami's 2008 KAG TG Reward for completing "Backseat Driver" Yaran story.
There is a total of 15 Criptograma Chests in Far Cry 6. After opening each of them you will receive a piece of high-grade armor. Criptograma Chest requires you to find 2 nearby Criptograma Charts which are used as keys to open the chest.
Fuego Boots MK II Fuego Boots MK II (Foot Gear). To open it you need: #09 - Tarantula and #26 - Boxing Gloves.
Fuego Coat MK II Fuego Coat MK II (Chest Gear). To open it you need: #08 - Car Clásico and #15 - El Flamenco.
Fuego Helmet MK II Fuego Helmet MK II (Head Gear). To open it you need: #13 - Cat and #29 - Soursop.
Fuego Mitts MK II Fuego Mitts MK II (Wrist Gear). To open it you need: #04 - Starfish and #23 - Libertad Emblem.
Fuego Pants MK II Fuego Pants MK II (Leg Gear). To open it you need: #17 - Coin and #20 - Mamey Sapote.
Hazmat Gloves MK II Hazmat Gloves MK II (Wrist Gear). To open it you need: #01 - Yaran Flag and #06 - Royal Palm.
Hazmat Mask MK II Hazmat Mask MK II (Head Gear). To open it you need: #07 - El Cocodrilo and #27 - Tocororo.
Hazmat Pants MK II Hazmat Pants MK II (Leg Gear). To open it you need: #18 - Cigar and #21 - Croco Taxi.
Hazmat Shoes MK II Hazmat Shoes MK II (Foot Gear). To open it you need: #05 - Machete and #24 - Chalice.
Hazmat Suit MK II Hazmat Suit MK II (Chest Gear). To open it you need: #14 - Horse and #30 - Domino.
Rioter Boots MK II Rioter Boots MK II (Foot Gear). To open it you need: #03 - Pig and #22 - Dog.
Rioter Gloves MK II Rioter Gloves MK II (Wrist Gear). To open it you need: #10 - Rooster and #25 - Yara Libre.
Rioter Helmet MK II Rioter Helmet MK II (Head Gear). To open it you need: #16 - El Trompo and #19 - Sunrise Mariposa Flower.
Rioter Pants MK II Rioter Pants MK II (Leg Gear). To open it you need: #02 - La Guitarra and #11 - Rum.
Rioter Vest MK II Rioter Vest MK II (Chest Gear). To open it you need: #12 - Shark and #28 - Yaran Queen Butterfly.
You can find 30 Criptograma Charts if Far Cry 6. They are needed to open the Criptograma Chests. To open each chest you must find two nearby charts.
#01 - Yaran Flag
#02 - La Guitarra You can climb here from the east side (grappling hook + vines).
#03 - Pig
#04 - Starfish You must destroy the wooden pallet blocking access to the inside of the wrecked car.
#05 - Machete
#06 - Royal Palm
#07 - El Cocodrilo
#08 - Car Clásico
#09 - Tarantula At the top of the tower. To get there you will have to use your grappling hook and climb the vines.
#10 - Rooster
#11 - Rum
#12 - Shark You have to dive to the bottom of the sea.
#13 - Cat You must destroy the boards blocking access.
#14 - Horse
#15 - El Flamenco
#16 - El Trompo
#17 - Coin It is in a cave that you can get to in two ways. Through the "back entrance" or from the sea side (you have to destroy the red net).
#18 - Cigar Use the grappling hook to get to the roof of the neighboring (southern) building and then ride the zip line.
#19 - Sunrise Mariposa Flower
#20 - Mamey Sapote
#21 - Croco Taxi You can reach the roof by climbing the scaffolding located on the bay side.
#22 - Dog
#23 - Libertad Emblem First, you must destroy the wooden planks blocking access to the inside.
#24 - Chalice
#25 - Yara Libre
#26 - Boxing Gloves The entrance to the tower is underwater.
#27 - Tocororo
#28 - Yaran Queen Butterfly
#29 - Soursop You must destroy the boards blocking access.
#30 - Domino
There are a total of 13 Roosters which can be found while exploring Yara. They are all located inside the wooden crates marked with the rooster icon. Two of them are related to Yara stories.
Acero
El Águila
El Dorado You will find it in the bunker, which you can enter during the "Spur of the Moment" Yaran story.
El Fénix
El Gallo Magnifico You have to play the "Everything to Loose" Yaran story to be able to collect it. The key to the shed lies on the table in the house.
El Huevo
El Pico
El Rato
Hermoso
La Bala De Plata
La Bestia Blanca
La Muerte Negra
Papacito
The USB Songs are one of the types of collectibles that can be found in Far Cry 6. 15 of them can be found in total.
Abuso De Poder
Ay Lola "La Figura" It's a reward for finishing the "And the Beat Goes On..." treasure hunt.
Dinero
Educate Ya
Here We Kum You will find it in the small storage area on the patio where the game started. You will need to revisit this location.
Hitboy
La Bella Ciao De Libertad
La Vida Me Cambió
Los Caminos De La Vida
Macarena (Bayside Boys Remix)
Pulpa De Tamarindo
Pxssy Powah!
Sentimento Original
What A Bam Bam
Yo Aprendí
Blood Drunk
Bullseye
Camo Quinceañera Reward for completing "A Rising Tide" treasure hunt.
Carriage Carnage
COM.PEW.TER
Crackle & Pop
Death Rites
DIY Death
El Caballero
El Florecer
El General In a room in the basement of the bunker. To open the door to this room you will need a keycard which you will find on the table just after entering the bunker.
El Regalo De Clara You will receive it from Clara after completing main operation "Against the Wall".
El Rubi
El Tirano
Excavation Execution To get this weapon you must complete "The Long Drop" treasure hunt.
Fuck Antón To open this chest you must complete the "Fetch Quest" Yaran story and get the Mysterious Key.
Hi-Fi
Humidora
Impact Driver
Into Orbit It's a reward for completing the "Liquid Courage" treasure hunt.
Iron Curtain
La Guaracha
La Petite Mort It's a reward for completing the "Sword-Crossed Lovers" treasure hunt.
Lethal Dose It's a reward for finishing "The Mongoose and the Man" treasure hunt.
Noblesse Oblige
Pistola Sportiva
Sharkbite Inside a small, enclosed room. The card needed to open it can be found on a desk in the main building.
Sink or Swim At the bottom of the lake. You have to dive in.
SMG-Issimo
Snapshot
Sobek Special Inside the bunker. Reward for completing "Cache Money" treasure hunt.
Streamline Moderne It is in the bunker. To get here you will need a key which is located in the building above the bunker. It is on the table near the hatch to the bunker.
Supercharger To get to the shipping container where the case is, you must lift the adjacent container. To do this you must press the button located in the white room located in the southwestern part of the platform.
Surf & Turf Reward for completing the "Crocodile Tears" treasure hunt.
The Autocrat In the cave under the fortress. To destroy the fence and get to the chest shoot the barrels with explosives.
The Heroic End
The Transubstantiator Just go down through the manhole and down the ladder.
The True Loyalist To get this weapon you must complete "The Truest Yaran" treasure hunt.
Turn of the Century
Urushi
Vaya Con Dios
Zona-51
¡Viva Libertad!
Hidden Histories are collectible items that can be found while exploring the game world. They are usually documents of various kinds, occasionally some plaques, etc.
Art Scraps I
Art Scraps II
Art Scraps III
Art Scraps IV
Art Scraps V
Bembé's Secrets I
Bembé's Secrets II You visit this room while doing "Balance the Books" operation.
Bembé's Secrets III You can visit this room during the "Lost and Found" main operation.
Bembé's Secrets IV You visit this room while doing "Intervention" main operation.
Bembé's Secrets V
Bembé's Secrets VI
Diary Page I To get inside the house complete the "Passing the Torch" treasure hunt.
Diary Page II It's inside Apito-Bara Cave.
Diary Page III You will find it in the underground of the fortification.
Diary Page IV
Diary Page V You have to go down into the sewers.
Doctor's Correspondence I
Doctor's Correspondence II
Doctor's Correspondence III
Doctor's Correspondence IV
Edgar's Experiments I
Edgar's Experiments II
Edgar's Experiments III
Edgar's Experiments IV
El Pequeño I
El Pequeño II
El Pequeño III
El Pequeño IV
Escape Journal I
Escape Journal II
Escape Journal III
Escape Journal IV
Escape Journal V
Family Record I
Family Record II
Family Record III
Family Record IV
Ghost Stories I
Ghost Stories II
Ghost Stories III You have to visit this control room while doing "The Long Drop" treasure hunt.
Ghost Stories IV
Ghost Stories V
Holy Pages I It's inside Oluwa Cave.
Holy Pages II
Holy Pages III In the well you will get to when doing the "Okú's Triada Relic" treasure hunt mission.
Holy Pages IV You will find it shortly after entering the cave.
Holy Pages V After you complete the "Triada Blessings" Yaran story.
Hoser's Notes I
Hoser's Notes II
Hoser's Notes III
Hoser's Notes IV
Hoser's Notes V
Improvisations I
Improvisations II
Improvisations III
Improvisations IV
Improvisations V
Iselda's Journey I
Iselda's Journey II
Iselda's Journey III
Iselda's Journey IV
Furioso: Flames of Hell - Issue #1
Exterminador: Strike Force - Issue #2
The Cabinet of Dr. Médico - Issue #3
Shadow of Fantasma - Issue #4
¡Volta! Strikes Again - Issue #5
Gladiador Rising - Issue #6
Journalist's Notes I
Journalist's Notes II
Journalist's Notes III This room can look different depending on when you come here.
Lita's Notes I
Lita's Notes II
Lita's Notes III
Lita's Notes IV It's in the room on the left side of the altar.
Lita's Notes V
María's Notes I
María's Notes II
María's Notes III
María's Notes IV
María's Notes V
Montero Fragment I
Montero Fragment II
Montero Fragment III
Montero Fragment IV You will visit this locked cell during the "Second Son" operation.
Official Documents I
Official Documents II It's in the same bunker as the "La Bella Ciao De Libertad" USB Song.
Official Documents III
Patient Feedback I
Patient Feedback II
Patient Feedback III
Patient Feedback IV
Patient Feedback V
Patient Feedback VI
Personal History I
Personal History II
Personal History III
Personal History IV
Personal History V You will find it on the patio where the game started. You will need to revisit this location.
Philly Magic I
Philly Magic II
Philly Magic III
Philly Magic IV
Philly Magic V In Susurro Caves.
Rally Documents I
Rally Documents II
Rally Documents III
Rally Documents IV
Rally Documents V
Regime Relics I
Regime Relics II
Regime Relics III
Regime Relics IV
Rosa's History I
Rosa's History II
Rosa's History III
Rosa's History IV
Secret Message I
Secret Message II
Secret Message III
Secret Message IV
Secret Message V
State Histories I
State Histories II
State Histories III
State Histories IV
State Histories V
Submerged Note I
Submerged Note II
Submerged Note III
Submerged Note IV
Submerged Note V
Sword-Crossed Lovers I
Sword-Crossed Lovers II
Sword-Crossed Lovers III
Sword-Crossed Lovers IV
Sword-Crossed Lovers V
Sword-Crossed Lovers VI You can get here while doing "Sword-Crossed Lovers" treasure hunt. Dive or enter through a hole in the deck.
Tour Notes I
Tour Notes II
Tour Notes III
Tour Notes IV It's inside ¡Danza! Cave.
Tour Notes V You will find it on the patio where the game started. You will need to revisit this location.
Tour Notes VI
Grand Premio Races are different kinds of races (ground vehicle, plane, horse, jetski, etc.) in which your task will be to reach the end of the course before the timer goes down to zero. The route will be marked by a series of checkpoints. When you reach the next checkpoint you will be given extra time.
Biplane Blitz
Caffeine Crash Course
Four-Wheeler Fury
Horsing Around Derby
International Waters Relay
Malecon Miracle Mile
Mud Track Madness
Pipeline Views Tour
Unlicensed Cab Ride
V8 Victory Lap
Walking on Water Wipeout
Winged Beast Flight Plan
Hazardous Waste Disposal Venodiente (Crocodile).
Mamutito's Glen Mamutito (Hog).
Perros Demoníacos Den Black Demoníaco (Wolf) & White Demoníaco (Wolf).
San Pedro Sanguinario (Jaguar). It only spawns at night. If it's not here, try again later.
Treasure Hunts are a special type of activity available in the game. Your task is to find a way to get to the treasure. The first clue about what you should do will be given to you when you start the search and the next ones will be found on the way to the goal.
A Little Birdie Told Me To get access to the Wingsuit you should build a camp upgrade called the Hideout Network. Rewards: AR-C (Rifle), Trogon (Charm).
A Rising Tide Press buttons in this order: El Tigre Del Mar > Papi Chulo > El Lucky > Clarita > Roja Victoria. Reward: Camo Quinceañera.
And the Beat Goes On...
Cache Money
Crocodile Tears
High Supply Rewards: 150 XP, M16 A1 (Rifle), 2 Gun Powder, 2 Supremo-Bond.
Ída's Triada Relic
Liquid Courage
Mimo Abosi's Triada Relic
Okú's Triada Relic The Doubloon (Charm), Okú's Deliverance (Leg Gear), Okú's Triada Relic.
Parting Gifts Rewards: MGL-6 (Grenade Launcher), 1 Gun Powder (Resolver Material).
Passing the Torch SPAS-12 (Shotgun), Fifteen Wishes (Wrist Gear), 1 Supremo-Bond
Sweet Fifteen Rewards: MG42 (Light Machine Gun), El Unicornio (Horse), 300 Yaran Pesos.
Sword-Crossed Lovers Rewards: 150 XP, La Petite Mort (Unique Grenade Launcher), X Marks The Spot (Charm), 1,000 Yaran Pesos.
The Emerald Skull Rewards: Ída's War Dance (Charm)
The Last One to Leave
The Legend of La Princesa
The Long Drop Reward: Excavation Execution.
The Missing Muse Rewards: Dark Tech Mask (Head Gear), Life Preserver (Charm).
The Mongoose and the Man
The Truest Yaran
Boom Boom Reward for completing "Boom or Bust" Yaran story. You can also find him without needing to accept the quest. Dog is trapped inside a blue shipping container. Just shoot off the lock of this shipping container.
Chicharrón You will get it after you complete three Yaran storries: "Man's Best Enemy", "Pecking Order", and finally "Wingman".
Chorizo You will get it after you complete two Yaran storries: Who's a Good Boy? and Fetch Quest.
Guapo You will recieve it automatically during the "Juan Of A Kind" operation.
Oluso Reward for completing "Triada Blessings" Yaran story.
Backseat Driver
Big Papi in Little Yara Rewards: 100 XP, Love It When You Call Me (Chest Gear), Big Papi (Los Bandidos Leader).
Boom or Bust Read the note.
Everything to Loose
Fetch Quest It will be available after you complete the "Who's a Good Boy?" Yaran story.
Heavy Metal It will be available after you complete the "Stealing Thunder" Yaran story. Rewards: 100 XP, 1944 PETROV HS-100 "SEÑOR PINGA" (Land Vehicle), 100 Vehicle Scraps (Resource).
Loose Ends
Man's Best Enemy
Model Citizen
Nothing to Hide It will be available after you complete the "Everything to Loose" Yaran story.
Over Easy It will be available after you complete the "Spur of the Moment" Yaran story.
Paint the Town Rewards: 100 XP, Orange Paint Bucket (Charm), Zenia (Los Bandidos Leader).
Pecking Order It will be available after you complete the "Man's Best Enemy" Yaran story.
Shock Therapy
Spur of the Moment
Stealing Home Rewards: 100XP, Fuerza Béisbol (Head Gear), Baseball Bat (Charm), Freddy Jr. (Los Bandidos Leader).
Stealing Thunder
Supremacy You will receive this mission when you arrive on the island and complete the "Libertad Rises" main operation. To complete it you must collect the appropriate amount of depleted uranium which you will find near the Anti-Aircraft Sites.
Tanks for the Likes Rewards: 100 XP, 2020 Victoria Fly "Seeby" (Foot Gear), 1000 Yaran Pesos.
The First Love It will be available after you complete the "Pics Or It Didn't Happen" main operation.
The Seeds of Love It will be available after you complete the "The First Love" Yaran story. You will have to find Lorenzo's Children.
Triada Blessings
Tricks of the Trade It will be available after you complete the "Undercover Stud" Yaran story. Rewards: Sergio (Los Bandidos Leader).
Turn the Party It will be available after you complete the "Loose Ends" Yaran story.
Undercover Stud It will be available after you complete the "Bullet Points" main operation. Rewards: High Heel (Charm).
We're (Un)jammin' It will start automatically when you deactivate the first jammer during the "Tourist Trap" main operation. Rewards: 1 Gun Powder (Resolver Material).
Who's a Good Boy?
Wing and A Prayer
Wingman It will be available when you complete the "Pecking Order" Yaran story.
Places where Lorenzo's Children can be found. Finding them is the objective of "The Seeds of Love" Yaran story.
Camilo Kill the enemy soldiers and enter the building.
Felipe Follow the white smoke and you will reach a small hill where you will meet Felipe.
Juan To open the hut where Juan is, you will need a key which you will find on the table located next to the neighboring hut.
Maricela Pet the dog, then follow it to a small encampment located on the other side of the river. Maricela will be there.
Riel Sniff the white flower and then follow the illusion of the woman. Eventually you will return to the place where you started and you will meet Lorenzo's daughter.
Tiago To be able to enter the room where Tiago is staying, climb onto the roof of the neighboring building and shoot out the padlock on the door to his room through the window.
Xiomara A woman painting graffiti on the roof of one of the houses.
Finding the Admiral Benítez Billboards is a requirement for completing the "Tricks of the Trade" Yaran Story.
Admiral Benítez Billboard #1
Admiral Benítez Billboard #2
Admiral Benítez Billboard #3
Admiral Benítez Billboard #4
Admiral Benítez Billboard #5
Destroying the McKay Wave Jammers is an objective of the "We're (Un)jammin'" Yaran Story.
McKay Wave Jammer
McKay Wave Jammer
McKay Wave Jammer
McKay Wave Jammer
McKay Wave Jammer
McKay Wave Jammer
McKay Wave Jammer
McKay Wave Jammer
McKay Wave Jammer
McKay Wave Jammer
McKay Wave Jammer
Baseball Memorabilia are items that you must collect to complete the "Stealing Home" Yaran Story.
Baseball Glove
Baseball Jersey
Jock Strap
Finding and defacing Gabriel's Statues is a requirement for completing "Paint the Town" Yaran Story.
Gabriel Statue
Gabriel Statue
Gabriel Statue
Gabriel Statue
Gabriel Statue
Gabriel Statue
Gabriel Statue
Gabriel Statue
Gabriel Statue
Gabriel Statue
Gabriel Statue
Gabriel Statue
FND Bases are enemy camps that you can liberate by defeating all the enemies present in the base. The reward will be better if you do not get detected or cause the alarm to be raised. Depending on the base, optional objectives may also be available, such as freeing a hostage, downloading the data, capturing a vehicle, etc. Completing them will result in a better reward for you. Once liberated, bases can serve as fast travel points.
Cabeza Fuel Depot Rewards: 300 XP, 50 Gasolina.
Castillo Señorial Tobacco Factory Rewards: 300 XP, 50 Gasolina.
CCE Electrical Station 31 Rewards: 300 XP, 50 Gasolina.
Cortina Weather Station Rewards: 300 XP, 50 Gasolina.
Dulce Sugar Mill Rewards: 300 XP, 50 Medicine.
Espinosa University Rewards: 300 XP, 50 Medicine.
F.I. Escudo Steel Plant Rewards: 300 XP, 50 Metal.
FND 2nd Armored Division Rewards: 300 XP, 50 Metal.
FND Special Forces Base Rewards: 300 XP, 50 Medicine.
Fort Esperanza Rewards: 300 XP, 50 Gasolina.
Fort Santa María Rewards: 300 XP, 50 Gasolina.
GDP Oil Platform Rewards: 300 XP, 50 Gasolina.
Gran Roca Telecom Station Rewards: 300 XP, 50 Medicine.
La Divinidad Cathedral Rewards: 300 XP, 50 Medicine.
María Marquessa Productions Rewards: 300 XP, 50 Metal.
McKay Global Acid Plant Rewards: 300 XP, 50 Metal.
Roca Pequeña Sat Station Rewards: 300 XP, 50 Metal.
Sano Gusto Coffee Factory Rewards: 300 XP, 50 Gasolina.
Sureño Shipyards Rewards: 300 XP, 50 Metal.
Valle Prehistórico Rewards: 300 XP, 50 Medicine.
Yaran Marine Maintenance Rewards: 300 XP, 50 Medicine.
Aguda Cliffs Checkpoint Rewards: 250 XP.
Arroz Flatlands Checkpoint Rewards: 250 XP.
Cape Santa María Checkpoint Rewards: 250 XP.
Catalina Ridge Checkpoint Rewards: 250 XP.
Cielo Gardens Checkpoint Rewards: 250 XP.
Colinas Plains Checkpoint Rewards: 250 XP.
Del Toro Checkpoint Rewards: 250 XP.
Diamante Checkpoint E Rewards: 250 XP.
Diamante Checkpoint W Rewards: 250 XP.
Esperanza East Checkpoint Rewards: 250 XP.
Esperanza South Checkpoint Rewards: 250 XP.
Esperanza West Checkpoint Rewards: 250 XP.
Ída's Refuge Checkpoint Rewards: 250 XP.
Isabel Steppes Checkpoint Rewards: 250 XP.
Mirador Cape Checkpoint Rewards: 250 XP.
Mogote Foothills Checkpoint Rewards: 250 XP.
Nueva Vida Checkpoint W Rewards: 250 XP.
Okú Creek Checkpoint Rewards: 250 XP.
Palma Forest Checkpoint Rewards: 250 XP.
Robustas Hills Checkpoint Rewards: 250 XP.
Sagrado Checkpoint Rewards: 250 XP.
Tobacco Valley Checkpoint Rewards: 250 XP.
Vacía Coast Checkpoint C Rewards: 250 XP.
Vacía Coast Checkpoint N Rewards: 250 XP.
Vacía Coast Checkpoint S Rewards: 250 XP.
Ventosa Peninsula Checkpoint Rewards: 250 XP.
Anti-Aircraft Site ALPHA
Anti-Aircraft Site BETA
Anti-Aircraft Site CASTILLO PRIME
Anti-Aircraft Site CHI
Anti-Aircraft Site DELTA
Anti-Aircraft Site EPSILON
Anti-Aircraft Site ETA
Anti-Aircraft Site GAMMA
Anti-Aircraft Site IOTA
Anti-Aircraft Site KAPPA
Anti-Aircraft Site LAMBDA
Anti-Aircraft Site MU
Anti-Aircraft Site NU
Anti-Aircraft Site OMEGA
Anti-Aircraft Site OMICRON
Anti-Aircraft Site PHI
Anti-Aircraft Site PI
Anti-Aircraft Site PSI
Anti-Aircraft Site RHO
Anti-Aircraft Site SAMPI
Anti-Aircraft Site SIGMA
Anti-Aircraft Site TAU
Anti-Aircraft Site THETA
Anti-Aircraft Site UPSILON
Anti-Aircraft Site XI
Anti-Aircraft Site ZETA
A network of guerrilla hideouts. Once you build a Hideout Network in one of the Guerrilla Camps, they can serve as air drop / fast travel points.
Camp Máximas
Clara's Camp
El Agujero Story related.
Hideout Bolero
Hideout Charanga
Hideout Conjunto
Hideout Danzón
Hideout Descarga
Hideout Filin
Hideout Guaracha
Hideout Habanera
Hideout Mambo
Hideout Montuno
Hideout Songo
Hideout Timba
Hideout Trova
Libertad HQ
Mercurio Mecánico
Montero Farm
Patriotas Peak
San Cayetano Orphanage
Armonía
Barriga
Concepción
Feroza
Maldito
Malecón Heights Plaza
Pablo's Alley
Santa Leticia Square
Segunda
Verdera
Ambush Sites are a special activity in Far Cry 6. They are large crates guarded by several soldiers. Your task is to kill all the enemies around them and then collect the crate.
Codename: Aracari
Codename: Bananaquit
Codename: Cassowary
Codename: Coquette
Codename: Cotinga
Codename: Guácharo
Codename: Hoatzin
Codename: Hornbill
Codename: Ibis
Codename: Macaw
Codename: Motmot
Codename: Parrot
Codename: Pelican
Codename: Quetzal
Codename: Toucan
Across the Tracks
Beachhead Blues
Beachward Bound
Buenavista River Valley Run
Cache on the Coast
Caught Stealing Second
Downhill Dino Dive
Go with the Flow In a train car standing on an under-construction railroad overpass.
I Spy Pipeline Supplies
Leap of Guerrilla Faith
Lighthouse Liberties
Mining the Gap
Mogote Mystery Drop It is located on the roof of the building.
Never Been Kissed
Oceanview Real Estate
Peril at the Pentagram
Pillbox Panic
Seaside Supply Snatch
The Long Shortcut
Tree Cover Theft
Jewelry Boxes are small containers made of alligator leather in which you can find a weapon charm, some kind of ride prop ( mirror prop / dashboard prop) or a spray can. What you find in a particular box is random.
Libertad Crates are one of the crate types that can be found in the game. They will always contain either Wearable Gear or Supremo Bond, which you can use to purchase mods and upgrades to your Supremo backpacks.
FND caches are one of the crate types that can be found in the game. Their contents is semi-random. In most cases they will give you the gunpowder, sometimes they will give you a new weapon.
The places on the island that have their own names.
Abascal Farm
Agua Rica Shrimp Hatchery
Aguas Lindas GDP Depot
Airbase Garage
Alfaro Farm
Almendras Dam
Almirante Lookout
Álvarez Farm
Antón Castillo Crocodile Reserve
Antón Castillo's Villa
Apartment X-2
Apartment Y-1
Apito Farm
Apito-Bara Cave
Ardiente Lookout
Arrese Farm
Azúcar Plantation
Balzan Farm
Barrio Del Príncipe
Basílica De La Virgen
Bayares Charcoal Yard
Big Papi's Crash Site
BioVida Lab Facilities
BioVida Mobile Clinic
BioVida Research Facility
Boadas Farm
Bolívar Farm
Bonilla Farm
Borrero Farm
Botanical Gardens of Yara
Bustamante Farm
Café Taza
Carasso Farm
Carbonell Farm
Cardoso Mill
Cartagena Park
Casa Alvarado
Casa Benitez
Casa Benito
Casa Dario
Casa De La Madrina
Casa Del Viento
Casa Govantes
Casa Marroquín
Casa Molina
Casa Rivera
Casa Tejeda
Casas Del Lodo Residences
Castillo National Zoo
Castillo Señorial Tobacco Plantation
Caverna River GDP Depot
Cayo Villareal
Ceballos Farm
Chancletas Resort
Chuchi's
Clara's Command Center
Coco's Conuco Oven
Colonia Estate
Concepción Plaza
Conuco Vista
Corazón Alley
CSS Viateur
De Escalona Ruins
De Francisca Ranch
Del Paraíso Gas Station
Del Toro Airstrip
Delivery Yards
Dominguez Manor
Dorada Docks
Duarte Farm
El Cacique Ruins
El Dorado Cabins
El Duelo Falls
El Este Naval Stables
El Guardián of Esperanza
El Lucero Fishery
El Maratón Field
El Presidente Square
El Punto
El Rancho Bicho
El Rayo Cinema
El Remolino Fort
El Sorbo Lounge
El Tigre Dormido Hotel
El Toro Square
Escila Fort
Esmeralda Eco Farm
Esperanza Port
Etecsa Telepunto
FDA Airbase Olimpia
Felicidad
Fisherman's Shack
FND Bunker 43
FND Munitions Storage
FND Radar Bunker
FND Recruitment Offices
FND Special Forces Residence
FND Storage Facility
FND Storage Hub
FND Tank Depot
FND Tank Firing Range
FND Tank Training Grounds
Fontana Fort
Fort Balaceras
Fort Estrella Del Norte
Fort Lookout Ruins
Fort Oro
Fort Quito
Freddy's Boneyard
Gabriel Castillo Airport
Gabriel Castillo Public School
Garbey Farm
GDP Re-Education Center-N
GDP Re-Education Center-S
GDP Vehicle Station
González Charcoal Yard
Gran Cielo Meat Packers
Gran Finca Power Station
Grand Hotel Caballero
Groundwater Monitoring Station
Guau-Guau Island
Gurriel Farm
Herrera Farm
Hígado Bridge Lock
Hinojosa Farm
Hotel Amanecer
Hotel Paraíso
Iglesias Gas Station
Invicto Bunker
Iselda Park
Jaguar Control Post
Jején Tunnel
José's Villa
Juan's Crash Site
Juan's Office
Juantorena Farm
KSK Cement Plant
La Ballenda Resort
La Colmena
La Joya Chemical Plant
La Joya Fuel Depot
La Joya Local PDP Offices
La Joya Pipeline Injection Station
La Joya Pipeline Substation 1
La Joya Pipeline Substation 2
La Joya Pipeline Substation 3
La Joya Pipeline Substation 4
La Joya Pipeline Substation 5
La Joya Pipeline Substation 6
La Joya Pipeline Substation 7
La Joya Pipeline Substation 8
La Joya Port
La Joya Refinery
La Puerta Market
La Raja Bar
La Reina Island
La Triada Mural
Leños Largos
Leyva Farm
Lezcano Rodeo & Auction
Los Langostinos Café
Los Reyes Plaza
Lozanía Baseball Diamond
Lozanía FND Barracks
Lunático caves
Marlento
Marquessa Rum Distillery
Marquessa Villa
Márquez Garage
Martínez Airstrip
McKay Global Chemical Disposal
McKay Global Chemical Storage
McKay Global Drill Site A
McKay Global Drill Site B
McKay Global Drill Site C
McKay Global Drill Site D
McKay Global Offices
McKay Global Security Gate
McKay Global Supply Depot
Memorial Valley
Museum of the False Revolution
Naranjo
Naval Service Monument
Noventarmas International Airport
Ocaso Marina
Oceguera Farm
Ofelia García Park
Ojeda Farm
Ominosa Cave
Orquídea Villa
Ortega Croc Farm
Palmera Promenade
Paraíso Coast Square
PDP Booth Norte
PDP Booth Sur
PDP Field Office
PDP Headquarters
Pequeña Sur Beach
Perdomo Farm
Pérez Farms
Perez Lumberyard
Pez Volador Driving Club
Philly's Magic Workshop
Poesía
Port Cuero
Príncipe Pantera Park
Punto Este Lighthouse
Punto Norte Lighthouse
Quito Bay Blockade
Radio Tocororo
Ramos Sugar Plantation
Relámpago Lighthouse
Resolver Quarter
Resplandor Agriculture
Revmira
Revmira Supply Dock
Rey Del Diente Croc Farm
Río de Plata
Rogamos Island
Roncali Lighthouse
Roxas Farm
San Antonio De Padua Cemetery
San Gómez Hot Springs
San Miguel Fort
San Rafael Hospice
San Telmo Lighthouse
Sánchez Farm
Santa María Airport
Santo Amaro Cemetery
Santos Espinosa Dam
Schaub Pass
Segunda Field
Sendrowski Housing Blocks
Serpentino Park Visitor Center
Serrano Lookout
Sierra Perdida Supply Depot
Siete Pájaros Apartments
Siniestra
Sol De Piña Processing
Sotomayor Farm
South Esperanza Police Station
Star Rocket Brewery
Susurro Caves
Taíno Peak Relay Station
Tempestad Lighthouse
The Blue Hole Cave
The People's Pride Clinic
Toca Farm
Todos Santos Cemetery
Torre del León
Torres Warehouse
Tranquila Beach
Transmitter Station
True Yaran Academy
Turey Caves
Turgenev Comms Post
Vacía Coast Military Archives
Vacía Coast Military Kennels
Valera Lumberyard
Velazco Airstrip
Vélez Carpentry
Ventura Villa
Verde Agricultural Vehicles
Verde Azulado Apartments
Verdera Town Square
Victoria Sports Field
Villa Judía Hotel
Villar Farm
Viviro Nueve Plantation
Yami's Chop Shop
Yarabi
¡Danza! Cave
Sarah Jenkins is a veteran tech journalist with over 12 years of experience covering artificial intelligence, mobile innovations, and digital ethics. Her insights have appeared in leading technology publications worldwide.
